Amazon SES Third Party Email Sending Support
- Amazon SES Support
- Introduction
- Use for Closed-List Opt-In Subscriptions Lists Only
- Configuration
- Setting up SPF Records
- Setting up DKIM in AWS (Easy DKIM)
- Limitations
- Dependencies
- Related Projects
Amazon SES Support
Introduction
From, http://aws.amazon.com/ses/:
Amazon Simple Email Service (Amazon SES) is a highly scalable and cost-effective bulk and transactional email-sending service for businesses and developers. Amazon SES eliminates the complexity and expense of building an in-house email solution or licensing, installing, and operating a third-party email service.
Dada Mail supports Amazon SES, both by using the Amazon SES API (as well as using the Amazon SES SMTP Interface.)
Amazon SES is one solution to a problem faced by many people on shared hosting account: trying to send too many messages, too quickly. It also can help solve the problem found with people sending large mailings lists, even when they have the resources to send the messages themselves: problems with mail sending aren't a problem with just a few addresses, but with your entire mailing list.
SES does this by allowing you to send out your messages with what could be a very generous quota, while also having good deliverability: users who abuse the service are disallowed future use.
Amazon SES costs around $0.10 per thousand messages you send. See:
http://aws.amazon.com/ses/pricing/
for current pricing. Using the service in a testing, non-production mode is free.
Use for Closed-List Opt-In Subscriptions Lists Only
Since Amazon SES is an outside, third party sending service, you'll need to use a mailing list that's 100% confirmed opt-in. If you don't, complaints of abuse sent to Amazon will most likely disallow you from continuing to use their service.
Bounce Handler Support
Here's the overview of Bounce support for SES: http://docs.amazonwebservices.com/ses/latest/DeveloperGuide/index.html?SendingEmail.BounceAndComplaintNotifications.html
When you use Dada Mail with SES, Dada Mail will set the Return-Path header explicitly.
Dada Mail's included Bounce Handler has rules specifically for Amazon SES, and we do suggest using it, if you use Amazon SES.
Configuration
During installation of Dada Mail, you'll need to plug in your AWS Access Key ID and AWS Secret Access Key. You may also choose a AWS Region/Endpoint
Getting this all set up is fairly easy in the Amazon AWS control panel, although the steps are a little more numbered than we'd like them to be. Amazon AWS covers a plethora of different services.
Obtaining your AWS Access Key ID and AWS Secret Access Key
There's a few ways to create the necessary Users/Groups in the Amazon AWS system, that will then give you the necessary keys you need. Below, we describe a simple way that should give you a secure and specific user, just for SES.
Sign up for Amazon Web Services
Begin the signup procedure for Amazon's AWS:
https://portal.aws.amazon.com/gp/aws/developer/registration/index.html
You'll be asked to create a new Amazon account and give Amazon your payment information.
Set up an IAM User
Once you're signed up to AWS, log in:
https://portal.aws.amazon.com/gp/aws/manageYourAccount
Once logged on, you'll want to make a new IAM User here:
https://console.aws.amazon.com/iam/home?#users
Click the button labeled, Create New Users,
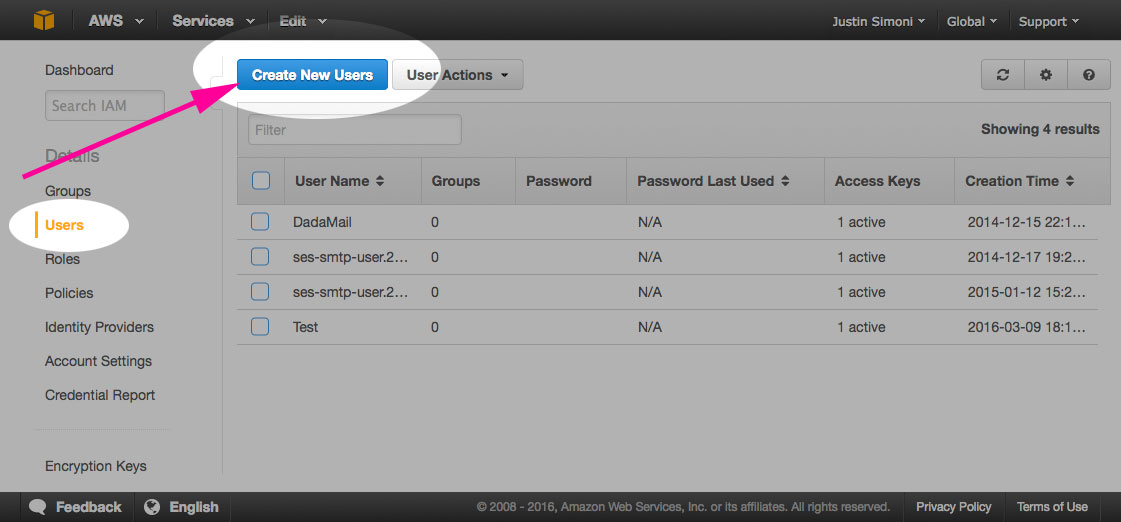
Create New Users
Under, Enter User Names: enter a username. For this walkthrough, I'm going to enter DadaMail.
Make sure, Generate an access key for each User is checked.
Click the button labeled, Create
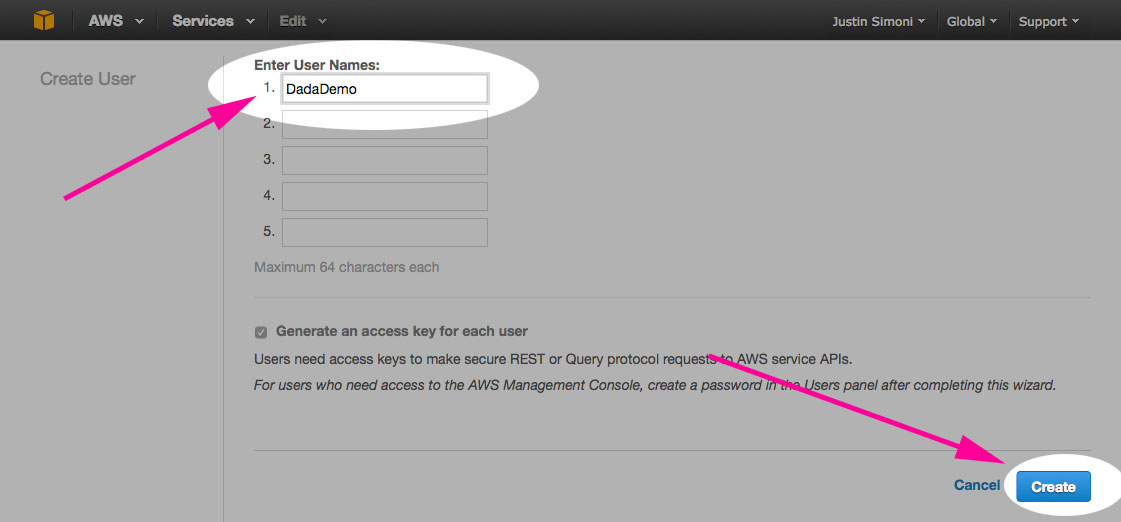
Create!
Once this new user is created, click the link labeled, Show User Security Credentials
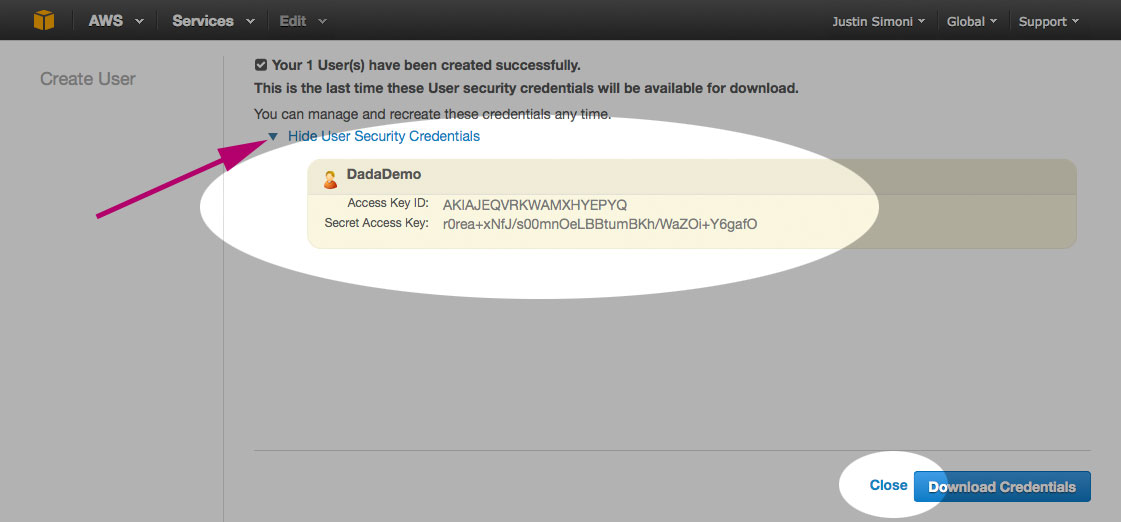
Show Security Credentials
and copy the, Access Key ID and, Secret Access Key. Save this information in a safe place: we'll need it later.
Once you're finished, click Close Window (you may have to do this twice)
We now have to attach a new User Policy.
Create a User Policy for your new User
Check the checkbox next to the user you just created.
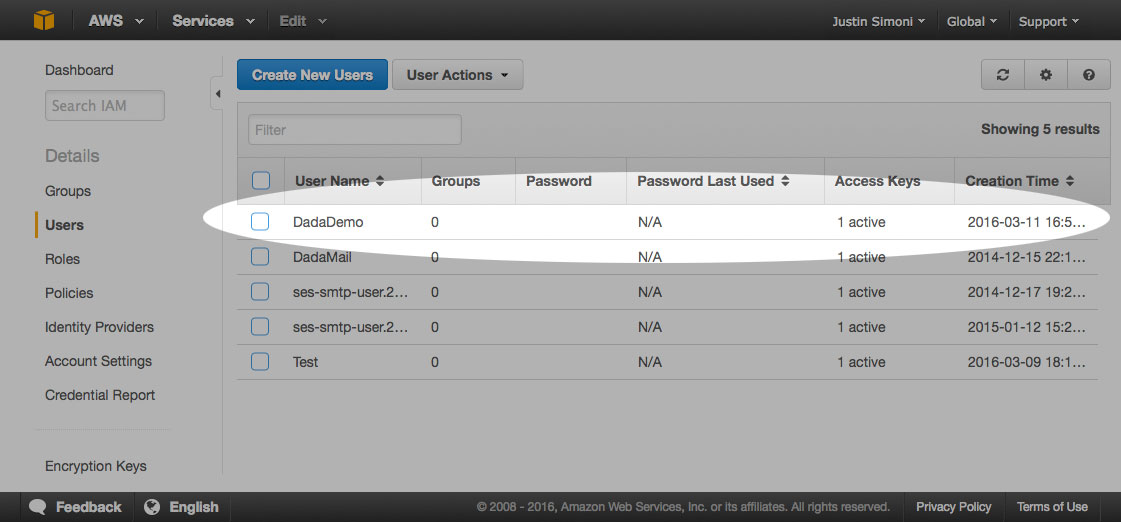
Select Your New User
Below the listing for this user, you'll see the user's details. Click on the Permissions tab.
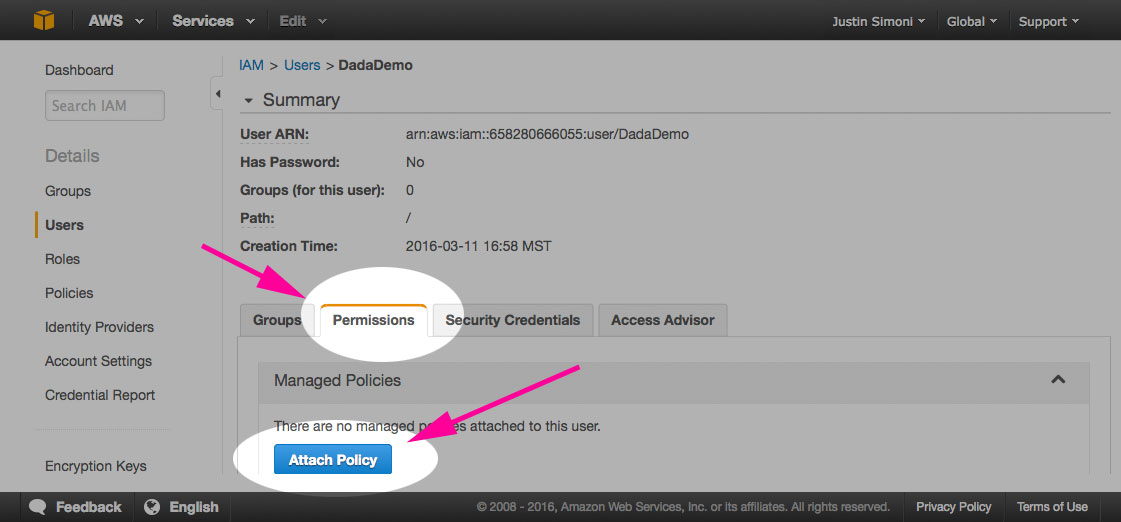
The, Permissions Tab
In that tab, click on the button labeled, Attach User Policy.
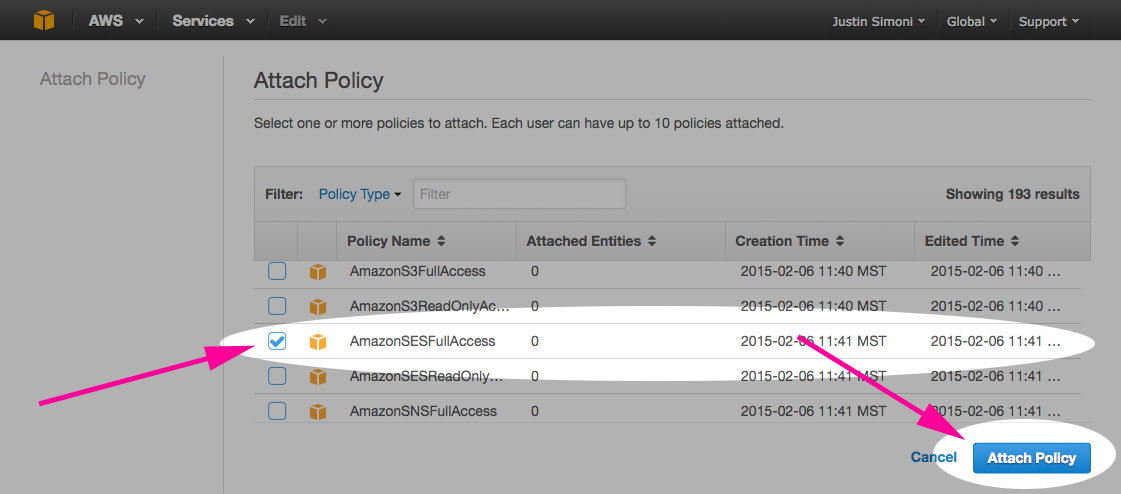
Attach User Policy
Under, Select Policy Template choose, Amazon SES Full Access.
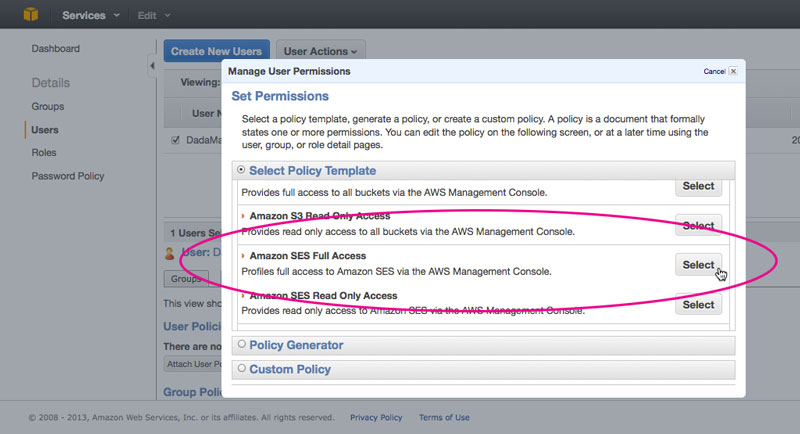
Select Amazon SES Full Access
The, Policy Name and Policy Document will be shown - we won't need to work with that, so just click the button labeled, Apply Policy
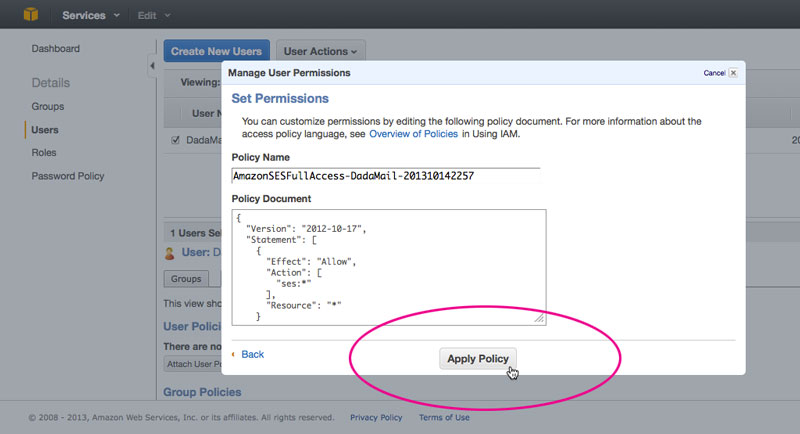
We can now use the Access Key ID and Secret Access Key in Dada Mail.
Set the Access Key ID and Secret Access Key in Dada Mail.
The Access Key ID and Secret Access Key are set in Dada Mail's global configuration file, called, .dada_config. You may either add the following lines directly in your .dada_config file:
        $AMAZON_SES_OPTIONS = {
                AWSAccessKeyId => 'AKIAI3K72UE32N5BRZSA',
                AWSSecretKey   => 'GIuwhcVRY2QaCk9BNpRsZOqIH7bF4jr1O5VeSkay',
        };
(using your own Access Key ID and Secret Access Key) Or, have the included Dada Mail Installer set this up for you:
Using the Dada Mail Installer
In the Dada Mail Installer, find the section labeled, Advanced Configuration (Optional).
Check the checkbox labeled, Configure Amazon SES.
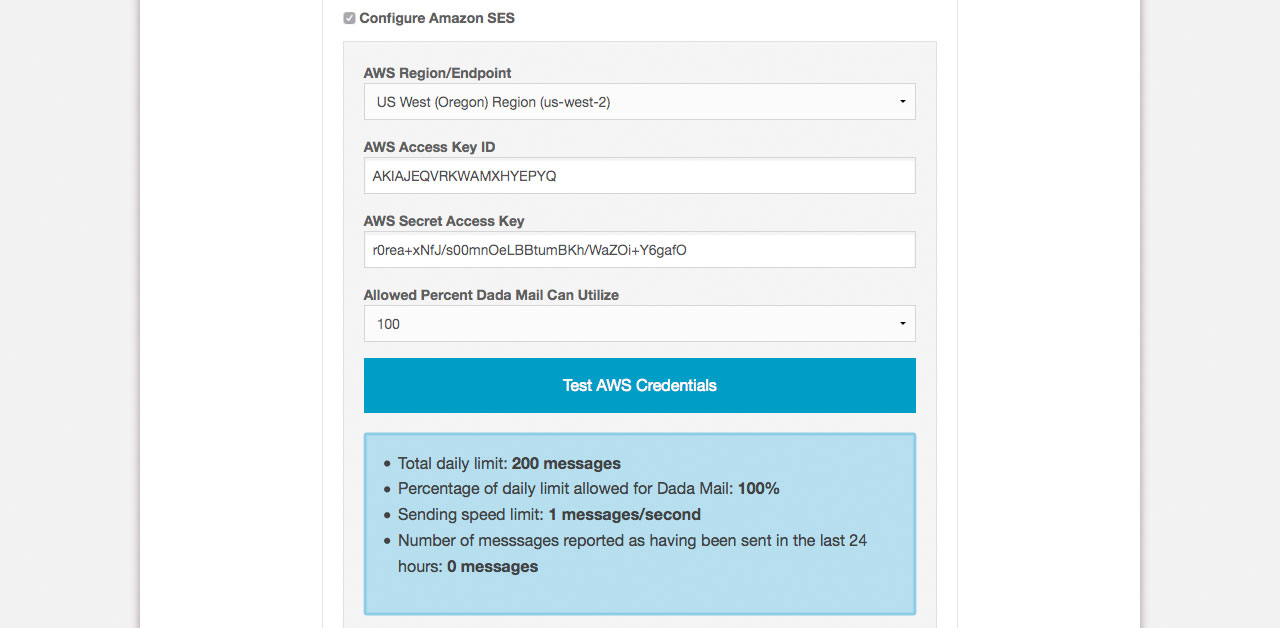
Configure Amazon SES
Textboxes to plug in the Access Key ID and Secret Access Key we just retrieved will be revealed. Plug in those two keys, and test them by clicking the button labeled, Test Your AWS Credentials.
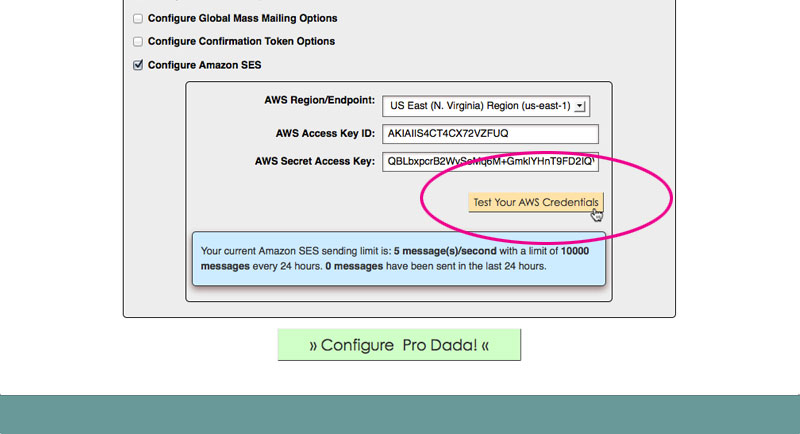
Testing the Amazon SES Credentials
If the credentials work, you'll be told what your current sending quota is.
Complete the installation/configuration by clicking, Configure Pro Dada/Dada Mail!
More Information on the Dada Mail Installer
The Dada Mail Installer can be used to install and upgrade Dada Mail, as well as change the global configuration of an already installed copy of Dada Mail.
More information on how to change the global configuration of an already installed copy of Dada Mail, see:
http://dadamailproject.com/d/install_dada_mail.pod.html
Other advanced configuration options are available to you:
http://dadamailproject.com/d/install_dada_mail-advanced_configuration.pod.html
Setting up a Mailing List to use Amazon SES Sending
Once the AWS Access Key ID and Secret Access Key are configured in Dada Mail, you can then set up a mailing list to use SES for sending.
Log into your mailing list and go to, Mail Sending - Options
Under, Send Messages Using:, select, Amazon Simple Email Service
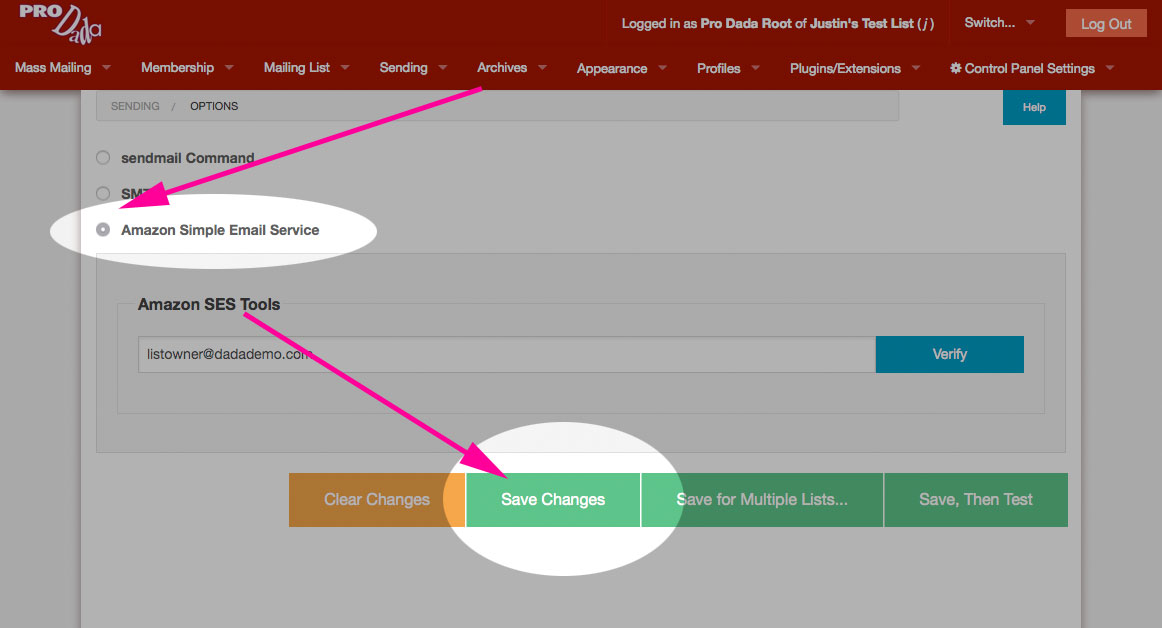
Selecting, Amazon Simple Email Service
If you haven't already, you'll need to also Verify each sender that'll be using the service. For Dada Mail, that means verifying the List Owner, and if you're using the Bounce Handler, perhaps the List Administration email address:
Under Amazon SES Tools fill in your List Owner's email address, and click, Verify Address For Sending.
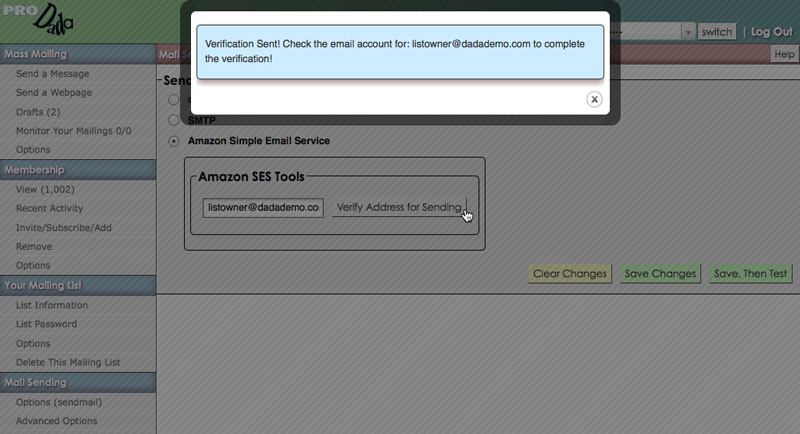
Verifying a Sender
That email account will receive an email message from Amazon AWS, with a verification link to click, to finish the verification process.
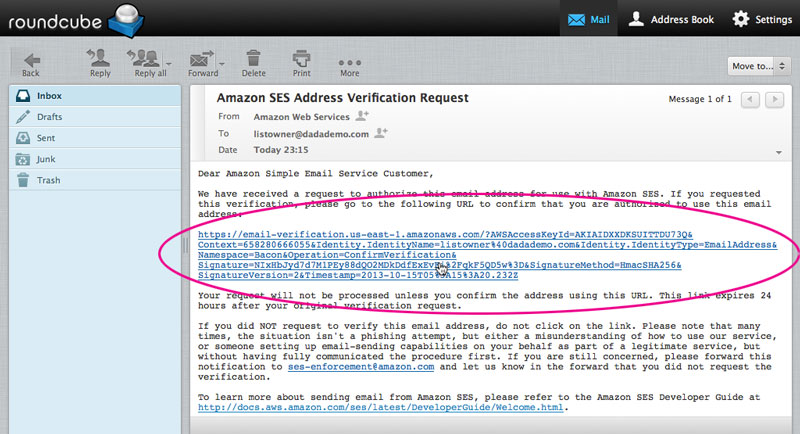
SES Sender Verification Email Message
Verifying the Bounce Handler
If you're using a different email address for your mailing list's List Owner, and List Administrator, make sure to verify both addresses.
This can be a little tricky, if the account for the List Administrator Address is being checked by the Bounce Handler, to process any bounced messages sent back from your mailing list.
What you'll basically need to do is check the POP3 mailbox of your Bounce Handler, before the Bounce Handler does. Easiest way to do that, is to remove the cronjob that runs the Bounce Handler on a schedule, send the Amazon SES sender verification email (using the same steps above), log into the email account yourself, find the message sent by Amazon SES and click on the verification email found in that message. Once that's done, you can reset the cronjob for the Bounce Handler, is it was before.
Other Ways to Verify a Sender
The Amazon SES Dashboard itself allows you to Verify a Sender:
https://console.aws.amazon.com/ses/home?#verified-senders-email:
Click the button labeled, Verify a New Email Address to get started.
Set Your Mass Mailing Batch Settings
When using SES for mail sending in Dada Mail, it's important to keep below the sending quota set by Amazon SES. This limit can fluctuate - usually upwards, while you use the service.
To make things easier, Dada Mail can be set to automatically adjust its Batch Settings to work within your limit, but not above it.
In Dada Mail's List Control Panel, go to: Mail Sending - Mass Mailing Options and check:
Automatically set batching speeds based on your Amazon SES limits
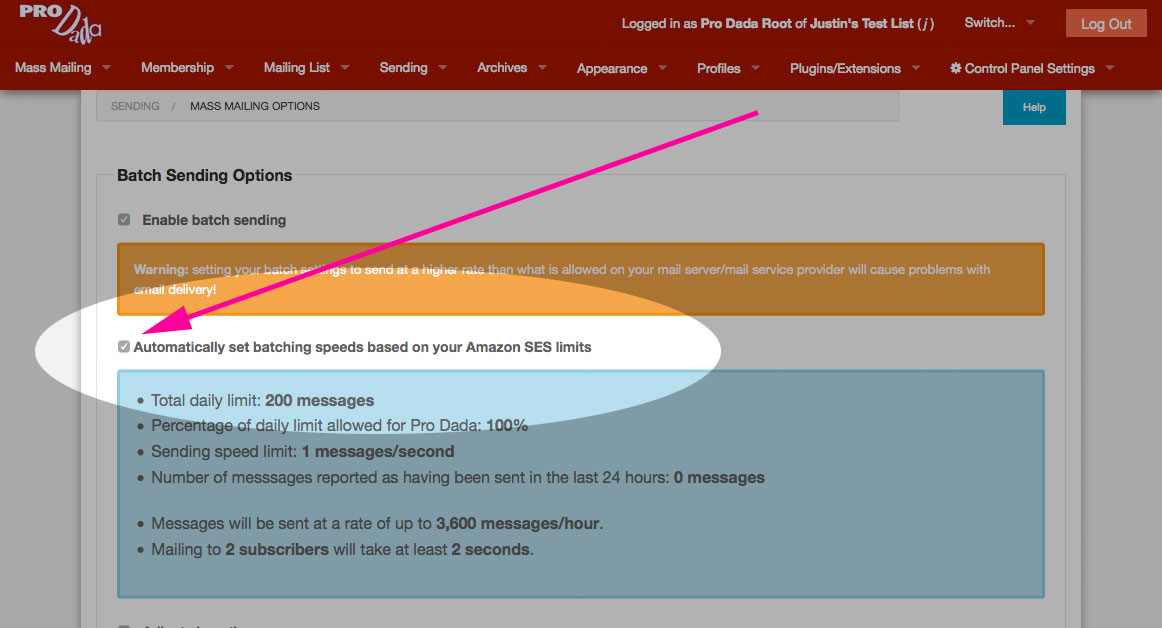
Auto-Adjust Batch Settings
Your batch settings will now grow or shrink, depending on your current Amazon SES sending limits. If you do go over your total 24 hour quota, mass mailings will not be sent out, and batches will be set to wait for 5 minutes, before trying to be sent again. When your 24 hour quota is lifted, sending will once again take place.
For the most part, Dada Mail will attempt to aggressively keep your batch sending speeds high, until you start coming near your daily mail quota set by SES.
When that happens, batch sending speeds will creep lower, to accomadate your limits. At no point should Dada Mail send either faster than it should, either by going over the limit per second limit, or the 24 hour limit.
Your SES sending limits themselves should creep up, as you use the service. Keeping the mass sending rates high will show the Amazon AWS system that you're utilizing the system, and they're most likely going to want to raise the limit for you.
Request Full Production Access
Once you're done testing Amazon SES, you'll want to request full production access here:
http://aws.amazon.com/ses/fullaccessrequest
Without full production access, you'll only be able to send messages to addresses that have manually been verified.
Setting up SPF Records
Setting up SPF Records to work with Amazon SES for your entire domain is covered at:
http://docs.aws.amazon.com/ses/latest/DeveloperGuide/spf.html
Setting up DKIM in AWS (Easy DKIM)
Dada Mail does not support sending messages with a DKIM signature, but Amazon SES does - thus, if you send messages with Dada Mail, through Amazon SES and set up Easy DKIM, your messages will be signed. Here's how to do that:
http://docs.aws.amazon.com/ses/latest/DeveloperGuide/easy-dkim.html
Limitations
Amazon SES API
Performance
Sending via Amazon SES is done with a persistent HTTP connection, so performance should be pretty good!. Expect around .3 seconds/message for just passing the email message from Dada Mail to the Amazon SES service.
Discussion List Support
By default, Dada Mail preserves the From: header address, when it sends out messages received from the mailing list's subscribers.
This makes using Amazon SES for discussion lists unrealistic, as every subscriber of your mailing list would need to be verified through Amazon SES.
You may try using Amazon SES for discussion lists, by checking the option in Bridge labeled,
Send messages, "On Behalf Of" (p.p. mode)
This will change Dada Mail's behavior to not preserve the From: header, but rather reset's this header to always be the List Owner's email address, which always should be verified with Amazon SES. This should allow you to conduct a discussion list with Dada Mail and Amazon SES.
Please note that when this option is set, replies to the mailing list will act a little differently, depending on which option you use. If you've set Bridge's prefs to:
Replies to messages should: be addressed to the sender
Reply-All functionality (sending the reply to BOTH the mailing list and the original sender) will not work correctly - the reply will only go to the original sender, if you Reply, or Reply-All.
The, Reply-To header will also be explicitly set to the original sender. We do that because the From: header munging, using this method does not preserve the original email address in the From: header, so unless we set the Reply-To: header, there's no way to easily reply to the original sender.
Different email headers sent
Amazon has a list of supported email headers:
http://docs.amazonwebservices.com/ses/latest/DeveloperGuide/AppendixHeaders.html
Dada Mail usually sends messages out with a different set of email headers:
The, Message-ID header will be sent as the, X-Message-ID header.
The, List header will be sent as the, X-List header.
Email headers that are not supported by Amazon SES are automatically not sent out.
Sending Quota
Amazon SES starts out with a small sending quota - 10,000 messages you may send in 24 hours, with a maximum 5 messages you can send every second. This quota can grow (and quickly), but make sure not to try to send out quicker than your quota can grow.
More Information
Dependencies
Amazon SES requires a few more CPAN Perl modules than the base Dada Mail install requires. Make sure you already have, or can install the following CPAN Perl modules:
Cwd
Digest::SHA
URI::Escape
MIME::Base64
Crypt::SSLeay
XML::LibXML
LWP 6
See also the FAQ, How do you install, "CPAN Perl Modules"
http://dadamailproject.com/d/FAQ-general.pod.html#how_do_you_install__cpan_perl_modules
Related Projects
We've seperated out the work we've done with Amazon and using a persistent HTTP connection. That project is located at:
https://github.com/justingit/Net--Amazon--SES


