

The following content is adapted from the Dada Mail Manual. The Dada Mail Manual is available through the purchase of Pro Dada.
Support Dada Mail by purchasing Pro Dada!
Professional installation is available.
Basic Installation
- Basic Installation Instructions for Dada Mail
-
- Before We Start: Advice:
- Step #1: Download Dada Mail
- Step #2 Uncompress The Distribution
- Step #3 Set The First Four Variables in the Config.pm File
- Step #4 Save the Config.pm File
- Step #5 Upload Dada Mail
- Step #6 Change the permissions of the mail.cgi file
- Step #7 Visit Dada Mail in your Web Browser
Basic Installation Instructions for Dada Mail
Before We Start: Advice:
These instructions will get you up and running, but we do suggest using the Advanced Installation instructions if you can. Upgrading and extending Dada Mail will be much easier and all our instructions to do so will assume that you have done an advanced installation.
Step #1: Download Dada Mail
Unless you have a good reason, always download the latest version of Dada Mail. You can download Dada Mail (if you haven't already) at:
https://dadamailproject.com/download/
There are two download links and they contain the same
distribution of Dada Mail. The only difference is that one has
the distribution in a, .tar.gz format, the other one
has the distribution in a, .zip format. When
uncompressing, if you cannot get one of the formats to
uncompress, just try the other one.
When you click the link, you'll be redirected to the SourceForge or to the Github site that holds the download files. Both sites host tools and services for Free Software Programs, like Dada Mail.
Save the distribution to your Desktop Computer.
Step #2 Uncompress The Distribution
Dada Mail is distributed in tar.gz format.
Anything from WinZip to Stuffit should be able to uncompress
it.
The distribution should uncompress one folder/directory called, dada. Inside this folder/directory, there should be a heirarchy of many other folders/directories:

The Dada Mail distribution, uncompressed.
If what you've uncompressed looks like the above, you're in good shape.
There's a lot of files, but I just want you to be concerned with two:
Step #3 Set The First Four Variables in the Config.pm File
Open up the DADA folder/directory. Inside this folder/directory is a list of files and folders/directories.
The only file we need to worry about is the file called,
Config.pm and it's located in the, DADA
directory:
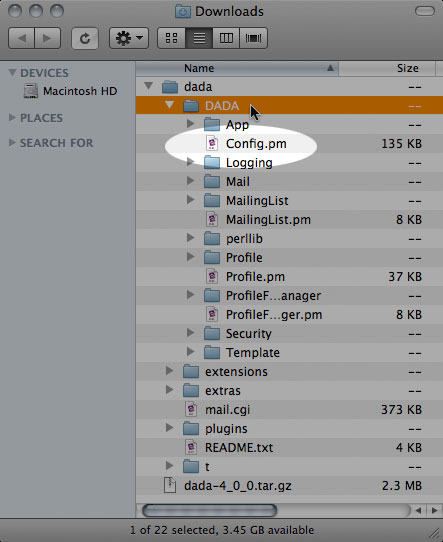
The location of the, "Config.pm" file
Open the Config.pm file in a text
editor - and I cannot stress this enough - make sure
it's a text editor, and not a word processor.
All these files are text files, and need to stay text files.
The Config.pm file holds four variables that you need to change to configure Dada Mail.
Your quick, 10 second introduction to Perl Variables:
- Variables are thingies that hold stand for something else.
-
Variables look like this:
$variable = 'something or other';
Variables can be easily found, since they begin with a
$ (dollar sign) in front of their name. You can set
a variable by following the variable name with an equals sign (
= ) and then what you want the variable to be set
to, usually enclosed in quotes. So, If I wanted to set the $name
variable to justin, I would type:
$name = 'justin';
Nothing to it. Be sure to end the line with a semi colon ( ; ). This is really important.
A Small Note about the Config.pm
The, Config.pm file holds embedded documentation
in a format called, POD. Be sure not to confuse the
embedded documentation with the actual variables you need to
change! One helpful thing is to use a text editor that can syntax
highlight Perl Code - the POD documentation and the actual
variables to change will be drastically differentiated. In these
examples, I'll be using a text editor called TextMate that knows
how to syntax highlight Perl and using a syntax theme called,
ZenBurn. In it, the embedded POD
documentation is a dull green and variables are white - very
handy.
Variable #1: $PROGRAM_ROOT_PASSWORD
The program root password is used to create new lists, and can
be used to log onto any list already created. To change
$PROGRAM_ROOT_PASSWORD to, bubbles,
change the $PROGRAM_ROOT_PASSWORD, like this:
$PROGRAM_ROOT_PASSWORD = 'bubbles';
Note! The $PROGRAM_ROOT_PASSWORD is by default
(and using these instructions) unencrypted. It is seriously
recommended to encrypt this root password as soon as Dada Mail is
set up using these instructions.
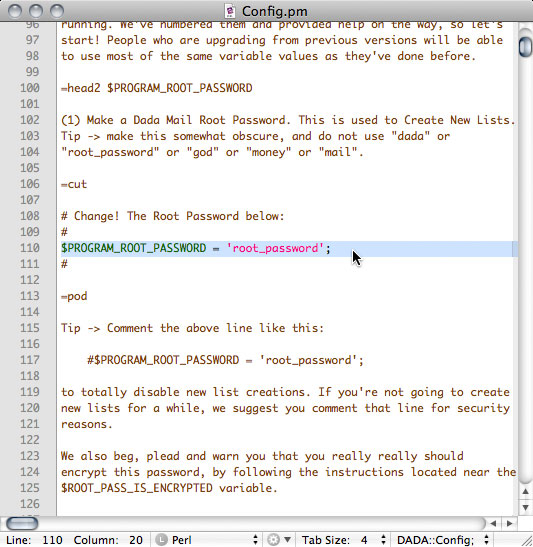
The, "$PROGRAM_ROOT_PASSWORD" variable in the Config.pm
file
Variable #2: $FILES
Dada Mail will write many different files when it works with
the mailing lists you create. It needs a place on your hosting
account to work on these files. This location needs to be spelled
out in the $FILES variable.
To do this, you need to change the $FILES
variable to point to an absolute path to a directory. An
absolute path is a path that starts with a '/'. For example:
$FILES = '/home/example/dada_files';
To clarify, my home directory is located at:
/home/example
In my home directory, I created a new directory called,
dada_files. This is the directory that Dada Mail
will use to save its files in.
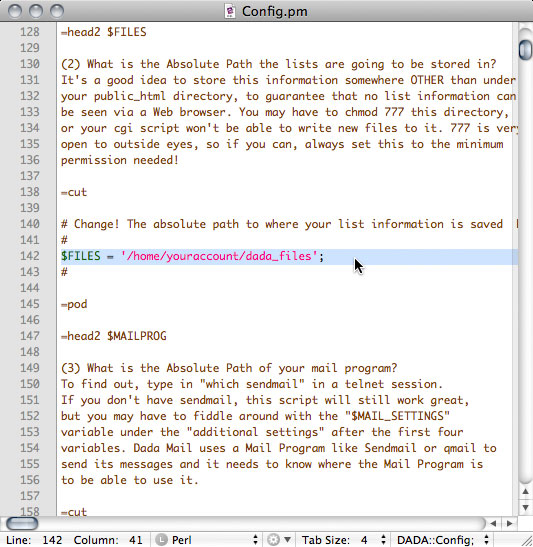
The, "$FILES" variable in the Config.pm file
It's a very good idea to put this directory somewhere other than under your public html directory, as to assure you cannot view the list files from a web browser.
Also, do NOT put this directory into your cgi-bin and most importantly, do NOT set this variable to any directory that points into your dada directory in your cgi-bin, or any directory inside this, "cgi-bin/dada" directory.
Got it? Good.
Tips on finding your home directory path
If you have Cpanel, the path to your home directory is usually located in the, Stats column:
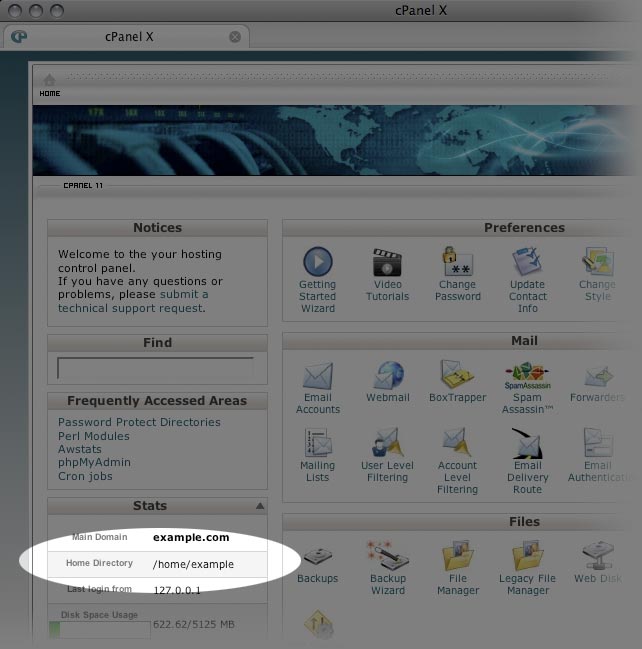
Finding your home directory, using CPanel.
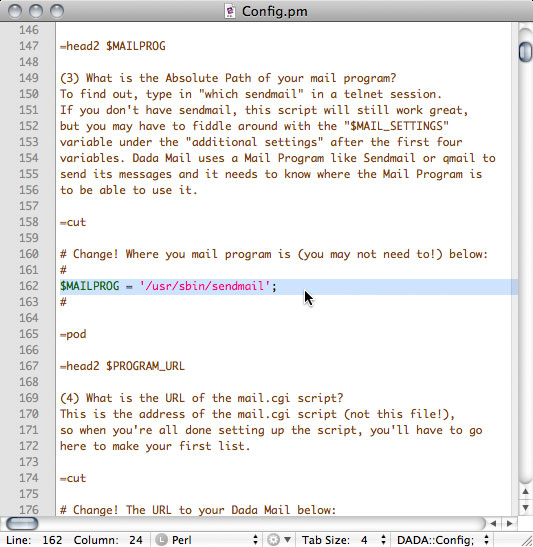
Variable #3: $MAILPROG
Dada Mail needs the location to the sendmail
utility to pass emails to, for them to be sent.
The, "$MAILPROG" variable in the Config.pm file.
Most likely, this utility is located at:
/usr/sbin/sendmail
or:
/usr/lib/sendmail
More often than not, you can install Dada Mail wthout touching this variable at all.
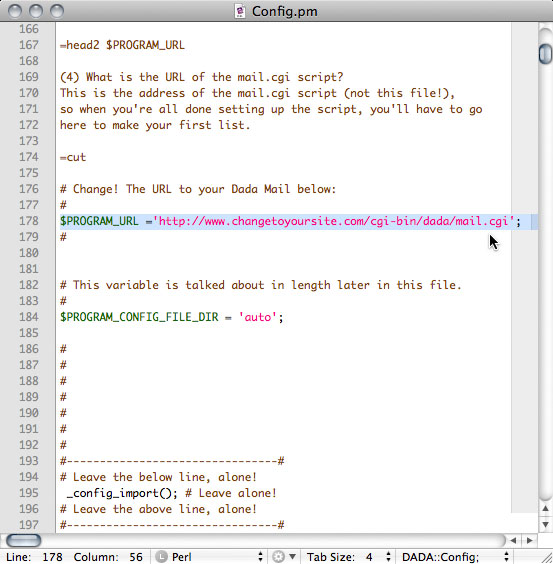
Variable #4: $PROGRAM_URL
This is the URL (http://) of where the mail.cgi script is going to be living. Not too jump ahead too far, but Dada Mail will need to be uploaded to your cgi-bin.
The, "$FILES" variable in the Config.pm file.
Most likely, $PROGRAM_URL should be set to:
$PROGRAM_URL ='http://www.changetoyoursite.com/cgi-bin/dada/mail.cgi';
where, changetoyoursite.com has been changed to the domain of your site.
Step #4 Save the Config.pm File
Save the Config.pm file - make sure that the file stays a text file, and that the line endings are not translated - fancy talk, I know, but if you use a bona-fided text editor and not a word processor, it shouldn't be a problem.
Step #5 Upload Dada Mail
Log into your hosting account using your FTP program and
navigate to your cgi-bin. Drag the,
dada directory that's on your Desktop Computer into
your cgi-bin.
![]()
Dragging and Dropping the entire Dada Mail distribution into
the cgi-bin
This may take a few minutes, as there are many hundreds of seperate files that makes up Dada Mail.
Step #6 Change the permissions of the mail.cgi file
Select the mail.cgi file and chmod (set the permissions of the file) it to, 755.
![]()
Setting the permissions for the mail.cgi file to,
"755"
Step #7 Visit Dada Mail in your Web Browser
Visit the mail.cgi script in your browser
(Hint: It's the URL you set the $PROGRAM_URL to). If all
goes well, you should a screen like this:
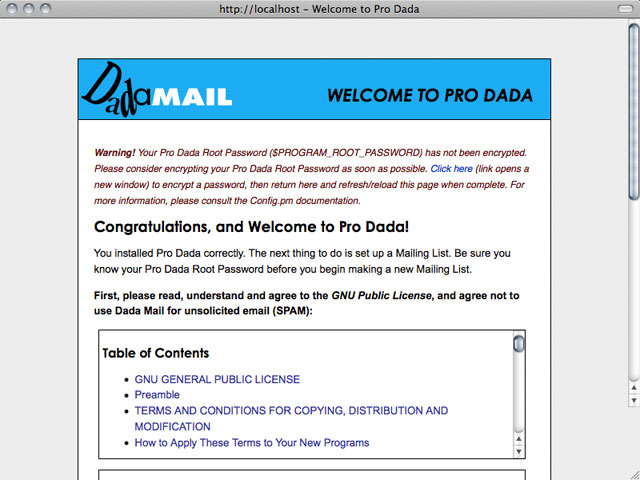
If you installed and configured Dada Mail correctly, you
should see the screen above. Good Job!
Congrats!