

The following content is adapted from the Dada Mail Manual. The Dada Mail Manual is available through the purchase of Pro Dada.
Support Dada Mail by purchasing Pro Dada!
Professional installation is available.
Advanced Installation
Advanced Installation of Dada Mail
We're going to move pretty quickly while talking about the advanced installation method of Dada Mail.
The main difference between the basic and advanced methods of
installing Dada Mail is that the advanced method saves its
configuration in an outside configuration file called,
.dada_config and we're setting up multiple
directories to save different types of file in.
Saving the configuration this way makes upgrading a lot easier and allows you to keep track of your global configuration changes.
In these directions, I'll be giving examples of shell commands you may issue to complete each step. They may need to be slightly modify to work with your particular environment. Noting too tricky, though.
Too Advanced?
If these instructions are too advanced for you, there is an alternative way to install Dada Mail, called the Semi-Automatic Advanced Installation method. It doesn't work on all hosting account setups, but it works on a surprisingly large pool of them. It's a bit of an experiment, but give it a try if the below is over your head.
Step #1 Upload Dada Mail onto Your Hosting Account
(If this step is going at too quick of a pace, try doing steps, #1, #2, #5 and #6 but skip steps #3 and #4 of the Basic Installation Method)
Download Dada Mail at:
https://dadamailproject.com/download
Either uncompress the distribution on your desktop and upload
the, dada directory into your cgi-bin,
or,
upload the .tar.gz distribution itself into your
cgi-bin and uncompress on your hosting account
(you'll need an ssh connection).
gunzip dada-3_x_x.tar.gz; tar -xvf dada-3_x_x.tar; cd dada
Change the permissions of the, mail.cgi file to,
755:
chmod 755 mail.cgi
Visit the, mail.cgi script in your web browser.
You should see the following screen:
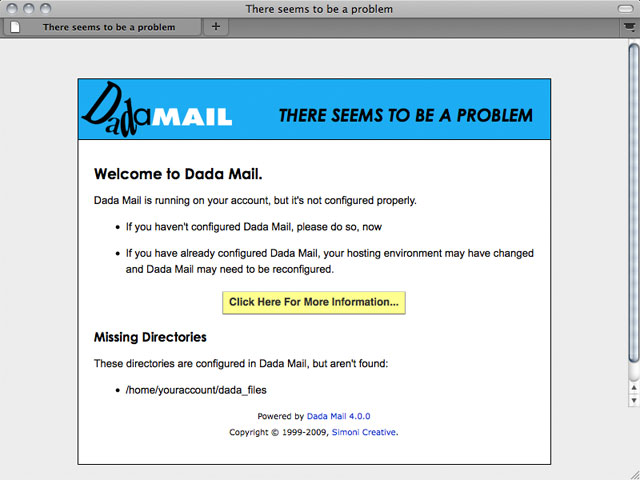
Dada Mail, complaining that it has not been
configured.
Note the URL that you used to access the mail.cgi
script. We'll be using that later.
Step #2 Create the .dada_files directory and directory hierarchy
In your home directory (preferably), create a directory
called, .dada_files. In this directory, create the
following directories:
You may use the following command:
 cd; mkdir .dada_files; cd .dada_files; mkdir .archives .backups \
 .configs  .lists .logs .templates .tmp
Step #3 Create the .dada_config file
A ready-to-use copy of the .dada_config file is
located in the,
dada/extras/examples/example_dada_config.txt file. Copy
the file/contents from this file into the
.dada_files/.configs directory we just set up, in a file
named, .dada_config
cd; cp public_html/cgi-bin/dada/extras/examples/example_dada_config.txt .dada_files/.configs/.dada_config
In the above command, public_html/cgi-bin/dada is the
path to the dada directory, inside the cgi-bin -
change to fit your environment.
Step #4 Edit the .dada_config file
To start off, the .dada_config file needs two
variables changed and they are the first two variables on top of
the file. They are:
-
$DIR
Set,
$DIRto the absolute path of the.dada_filesdirectory we just set up. If you don't know the absolute path, change into your .dada_files directory, and issue the,pwdcommand:cd; cd .dada_files; pwd
(prints,
/home/example/.dada_files, for example)Set the $DIR variable to this, like so:
my $DIR = '/home/example/.dada_files';
-
$PROGRAM_URL
Set
$PROGRAM_URLto the URL we used to access the,mail.cgiscript in the web browser.
$PROGRAM_ROOT_PASSWORD - The Dada Mail Root Password
You'll also want to set the main, Dada Mail Root Password for
Dada Mail in the .dada_config file. It's saved in the
variable, $PROGRAM_ROOT_PASSWORD. There's two ways
to do this:
The first is to set the, $PROGRAM_ROOT_PASSWORD
variable to the Dada Mail Root Password you'd like to use:
 # Start Root Password

 $PROGRAM_ROOT_PASSWORD    = 'sneaky';
 $ROOT_PASS_IS_ENCRYPTED   = 0;

 # End Root Password
Easy enough.
The second method is to set an encrypted version of our Dada Mail Root Password. This is what we seriously recommend.
To do so, visit your Dada Mail (in your web browser, go to the
URL you're setting in the $PROGRAM_URL variable) with this
query string: ?f=pass_gen. You're entire URL will
look like this:
http://example.com/cgi-bin/dada/mail.cgi?f=pass_gen
if, http://example.com/cgi-bin/dada/mail.cgi is the URL to your Dada Mail.
Follow the instructions to encrypt your Dada Mail Root
Password. You'll want to set the encrypted Dada Mail Root
Password in the, $PROGRAM_ROOT_PASSWORD variable as
well as setting the, $ROOT_PASS_IS_ENCRYPTED to,
1:
 # Start Root Password

 $PROGRAM_ROOT_PASSWORD    = '8PnbnHfLVeBra';
 $ROOT_PASS_IS_ENCRYPTED   = 1;

 # End Root Password
We are done setting up and configuring the
.dada_config file -
but do feel free to add to this outside configuration file
whenever you like - most any variable located in the
Config.pm file can be added to this file. Any
variable you do add, overrides the value you set in the
Config.pm itself. Think of the Config.pm file as
where the default configuration of Dada Mail lives and your
outside configuration file (.dada_config) is where
you'll want to set your customizations to make Dada Mail work
with your own setup.
Step #5 Setting up the Config.pm file
The only thing the Config.pm file needs to know,
is the directory the .dada_config file lives in. If
you set the $DIR variable inside
the .dada_config file to,
/home/example/.dada_files
the directory it lives in will be:
/home/example/.dada_files/.configs
Open up the Config.pm file that's located in the
dada/DADA directory and set the variable named,
$PROGRAM_CONFIG_FILE_DIR to the directory the
outside config file lives in, like so:
$PROGRAM_CONFIG_FILE_DIR = '/home/example/.dada_files/.configs';
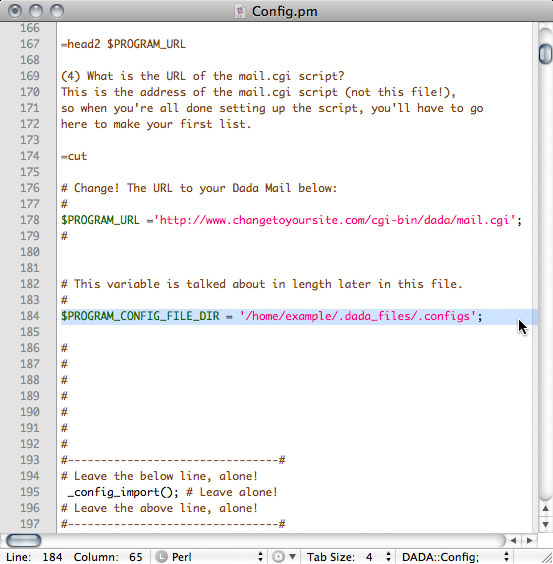
Setting the, $PROGRAM_CONFIG_FILE_DIR variable in the
Config.pm file
Save your changes.
Visit the, mail.cgi script in your web browser
again. If everything worked correctly, you should see the
following screen:
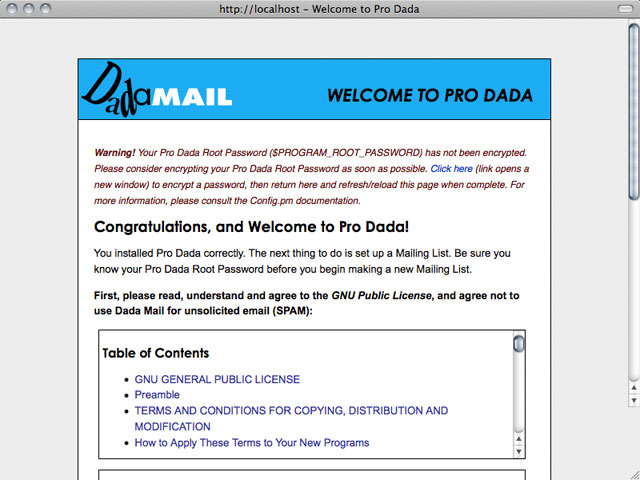
If you installed and configured Dada Mail correctly, you
should see the screen above. Good Job!
Congrats!