
Amazon SES Third Party Email Sending Support
- Amazon SES Integration with Dada Mail
- Configuration using the SES API
- Configure Dada Mail to use the SMTP Gateway Provided by Amazon SES
Amazon SES Integration with Dada Mail
Introduction
From, https://aws.amazon.com/ses/:
Amazon Simple Email Service (Amazon SES) is a cost-effective email service built on the reliable and scalable infrastructure that Amazon.com developed to serve its own customer base. With Amazon SES, you can send and receive email with no required minimum commitments - you pay as you go, and you only pay for what you use.
More Information: https://aws.amazon.com/ses/details/
Dada Mail can utilize Amazon SES to send out email both by using the Amazon SES API, as well as using the Amazon SES SMTP gateway.
Amazon SES is one solution to a problem faced by many people on shared hosting accounts who are faced with the problem that they are sending out too many messages, too quickly for the amount of resources available to them.
Amazon SES costs around $0.10 per thousand messages you send. See:
https://aws.amazon.com/ses/pricing/
for current pricing. Using the service in a testing, non-production mode is free.
We also provide setting up Dada Mail using your own Amazon SES account as part of our installation/upgrade offerings:
https://dadamailproject.com/installation/request.html
Our services for installing and configuring Amazon SES for your Dada Mail is a one-time fee.
Use for Closed-List Opt-In Subscriptions Lists Only
Since Amazon SES is an outside, third party sending service, you'll need to use a mailing list that's 100% confirmed opt-in. If you don't, complaints of abuse sent to Amazon will most likely disallow you from continuing to use their service.
Bounce Handler Support
Here's the overview of Bounce support for SES: http://docs.aws.amazon.com/ses/latest/DeveloperGuide/notifications.html
When you use Dada Mail with SES, Dada Mail will set the Return-Path header explicitly.
Dada Mail's included Bounce Handler has rules specifically for Amazon SES, and we do highly suggest using it, if you use Amazon SES, to comply with their terms of services.
Configuration using the SES API
During installation of Dada Mail, you'll need to choose the AWS Region/Endpoint you would like to utilize, then paste in your AWS Access Key ID and AWS Secret Access Key.
That's it.
Setting up things on the Amazon AWS side of this equation is a little more involved. We will describe the process below.
Later, we'll also describe how to set up Dada Mail just to use Amazon SES's SMTP gateway, which does not require you to set up an IAM User and configure the AWS Region/Endpoint, AWS Access Key ID, and AWS Secret Access Key into Dada Mail's configuration. You'll simply need to add the SMTP server, username and password to Dada Mail, like you would for any SMTP Server.
Obtaining your AWS Access Key ID and AWS Secret Access Key
Sign up for Amazon Web Services
If you don't already have an Amazon AWS account, begin the signup procedure for Amazon's AWS:
https://console.aws.amazon.com/
You'll be asked to create a new Amazon account and give Amazon your payment information.
For the SES service, there is no upfront cost: you are only billed for what you use.
Set up an IAM User
Once you're signed up for AWS sign in (if you aren't already):
http://console.aws.amazon.com/
We will need to create a new IAM user and add that user to a group that has full access to the SES service.
On the top bar, click on your name (my name is Justin in this walkthrough), and select, My Security Credentials.
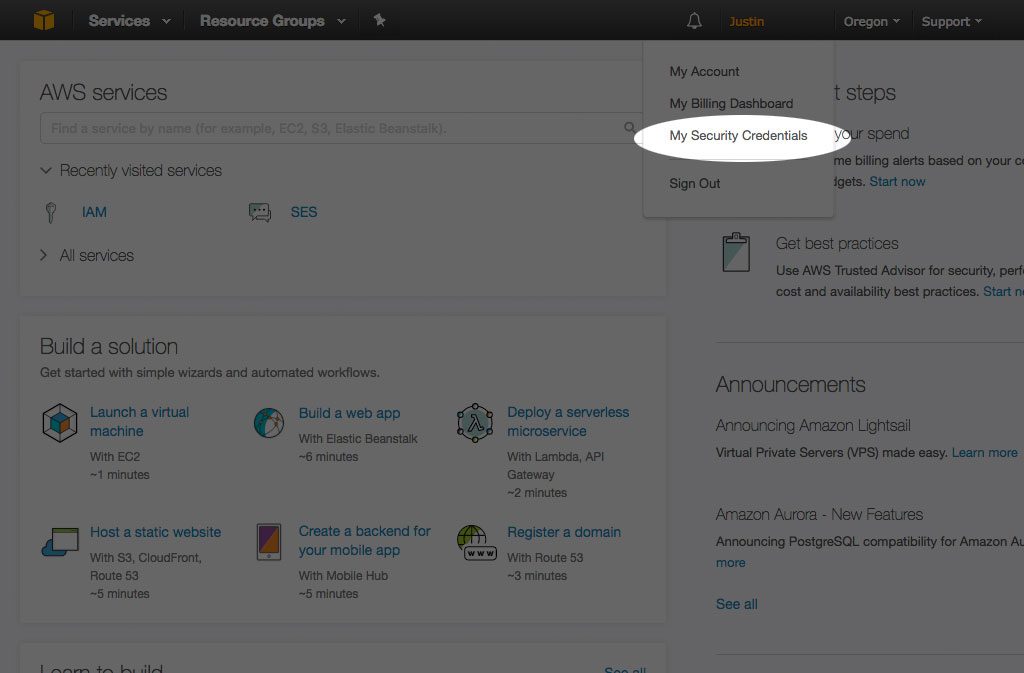
[Your Name]:My Security Credentials
Once the screen has refreshed:
Click, Users (#1) on the left hand menu, then, Add User (#2) at the top of the screen.
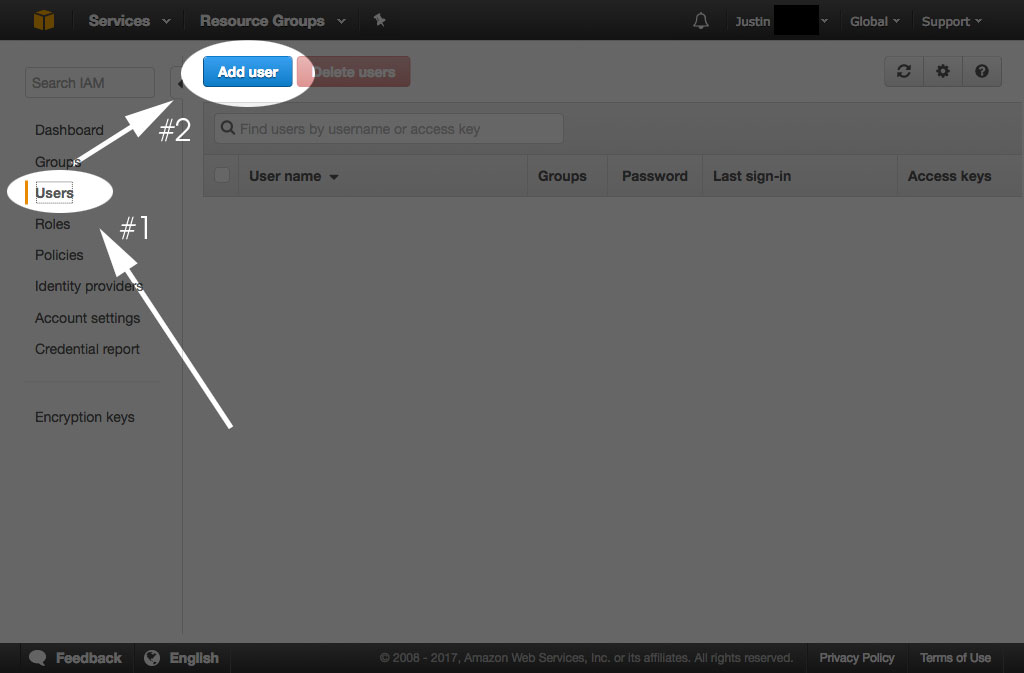
Users: Add User
Once the screen has refreshed:
Under, User name Enter a user name (#1). In this doc, I'm going to enter DadaDemo.
Under, Access type, select, Programmatic access (#2).
Then, click the button labeled, Next: Permissions (#3).
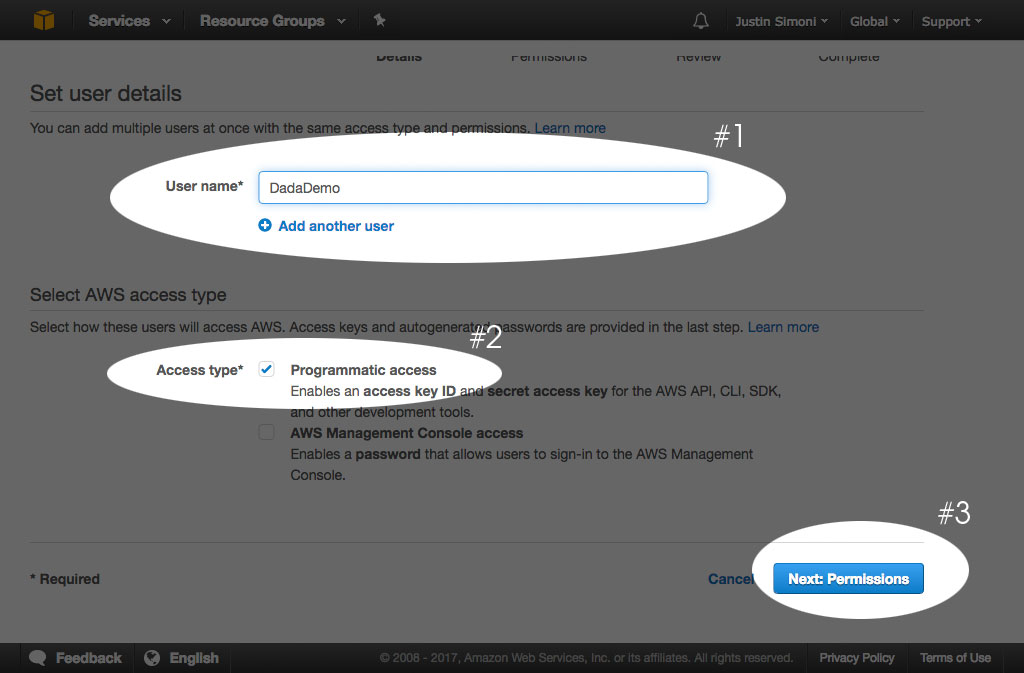
Set User Details
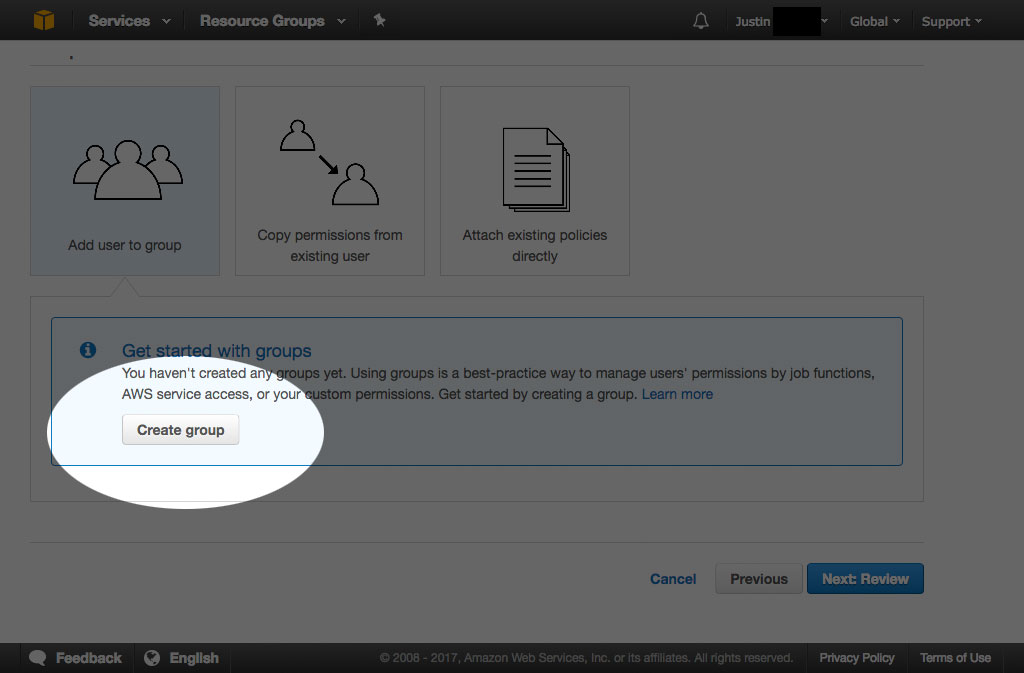
Once the screen has refreshed:
Click the button labeled, Create group. A modal window will be revealed.
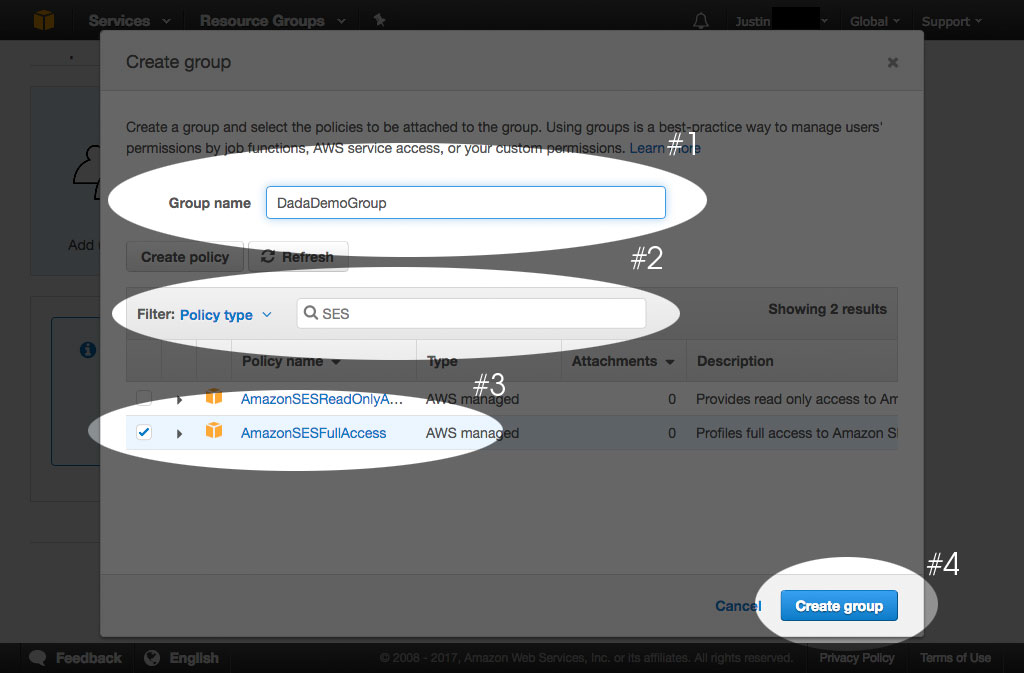
Create Group
Under, Group name, enter a group name. (#1). In this doc, I'm going to enter, DadaDemoGroup.
Now, select a policy. For our needs, we're going to select, AmazonSESFullAccess. You can use enter in, SES in the search filter (#2) to bring down the choices to something managable and easily select, AmazonSESFullAccess (#3)
Click the button labeled, Create group (#4)
Select Policy
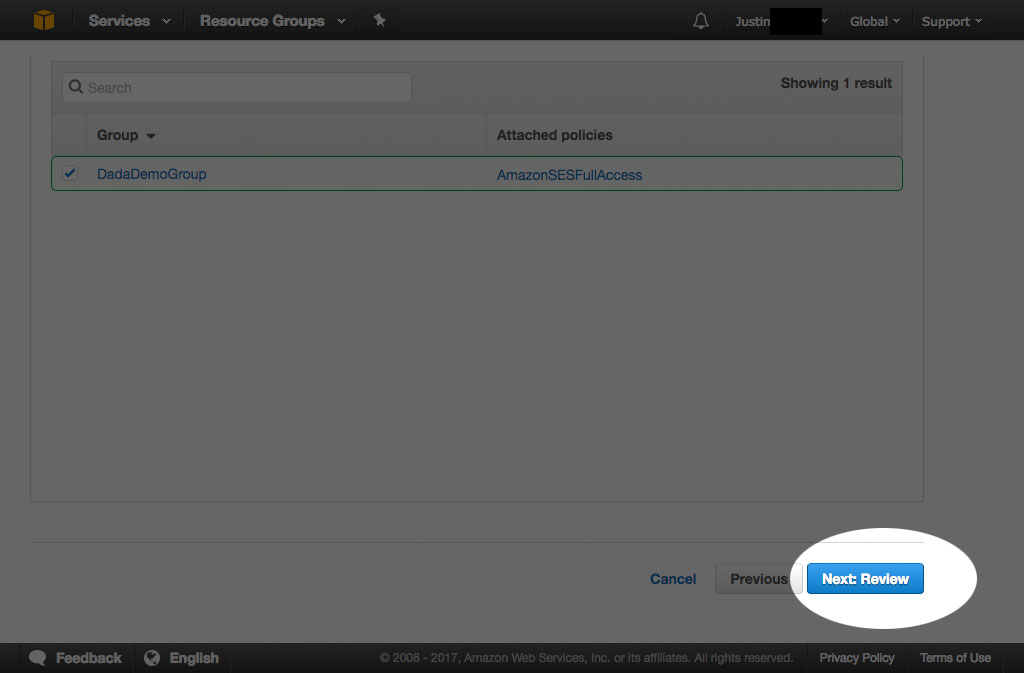
Once the screen has refreshed:
Click the button labeled, Next: Review.
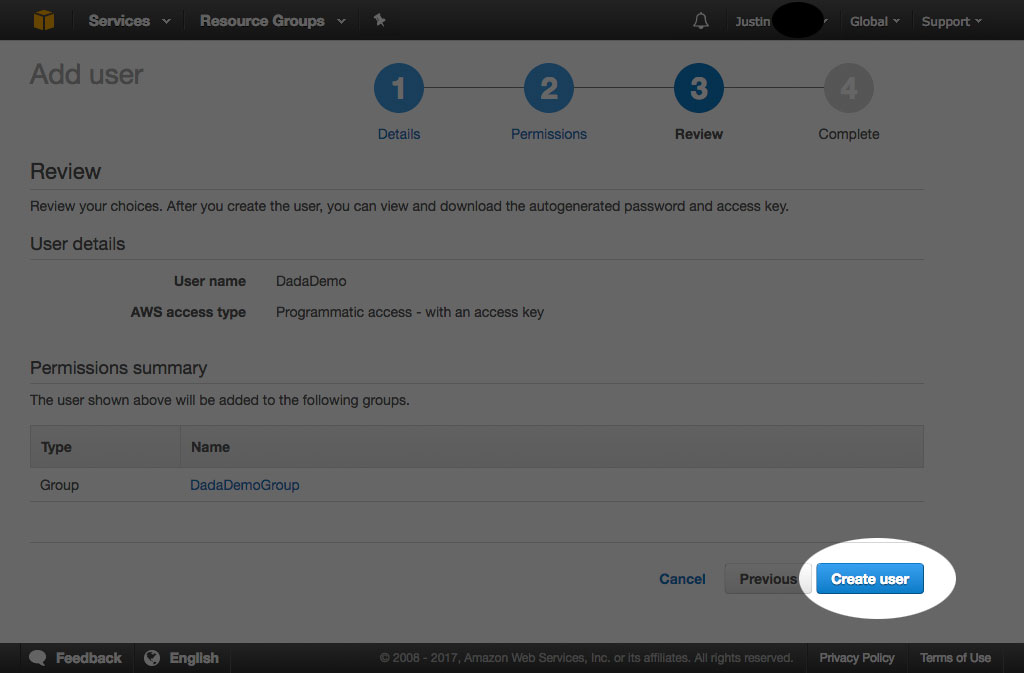
Review
Once the screen has refreshed:
Click the button labeled, Create user.
Create Group
Once the screen has refreshed:
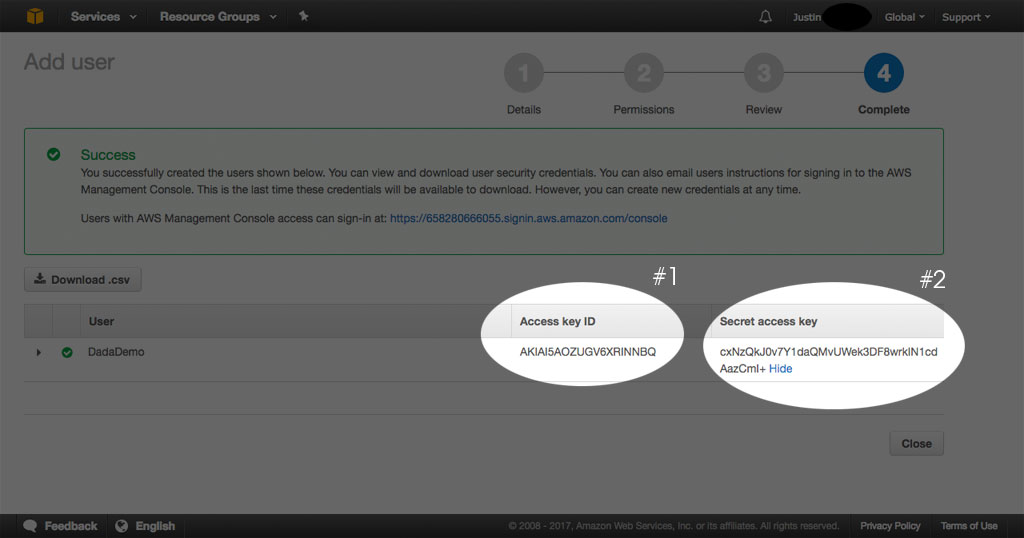
Copy both the, Access key ID (#1) and, Secret access key (#2) and set them aside in a safe place - we'll use them later.
Create Group
Set the Access Key ID and Secret Access Key in Dada Mail.
Using the Dada Mail Installer
In the Dada Mail Installer, click the button labeled, Show/Hide Advanced Options, then check the checkbox labeled, Configure Amazon SES.
Textboxes to paste in the Endpoint, Access Key ID and Secret Access Key we just retrieved will be revealed.
Paste in those two keys, and test them by clicking the button labeled, Test Your AWS Credentials.
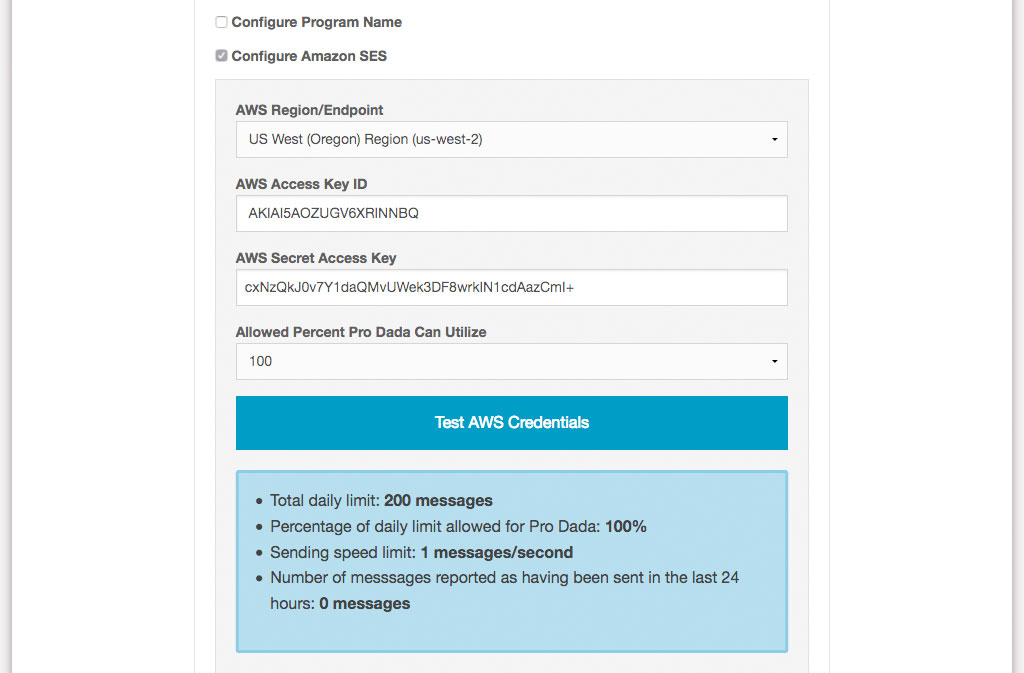
Configuring SES in the Dada Mail Installer
We'll talk about endpoints a little later, when we talk about Production Access.
Remember: you can drop into the installer to make additional global configurations, without having to reinstall or upgrade Dada Mail. See:
If the credentials work, you'll be told what your current sending quota is.
Complete the installation/configuration by clicking, Configure Pro Dada/Dada Mail
Manually
The Endpoint, Access Key ID, and Secret Access Key are set in Dada Mail's global configuration file, called, .dada_config. Add the following lines directly into your .dada_config file:
        $AMAZON_SES_OPTIONS = {
            AWS_endpoint                     => 'https://email.us-west-2.amazonaws.com/',
                AWSAccessKeyId                   => 'AKIAI5AOZUGV6XRINNBQ',
                AWSSecretKey                     => 'cxNzQkJ0v7Y1daQMvUWek3DF8wrkIN1cdAazCmI+',
                Allowed_Sending_Quota_Percentage => '100',
        };
(using your own Access Key ID and Secret Access Key).
Verifying a Domain with Amazon SES
Verifying a Domain with Amazon SES allows you to use any email address belonging to that domain that you would like for your List Owner and List Admin.
To verify a domain, sign back into your AWS console.
Go to Services: SES.
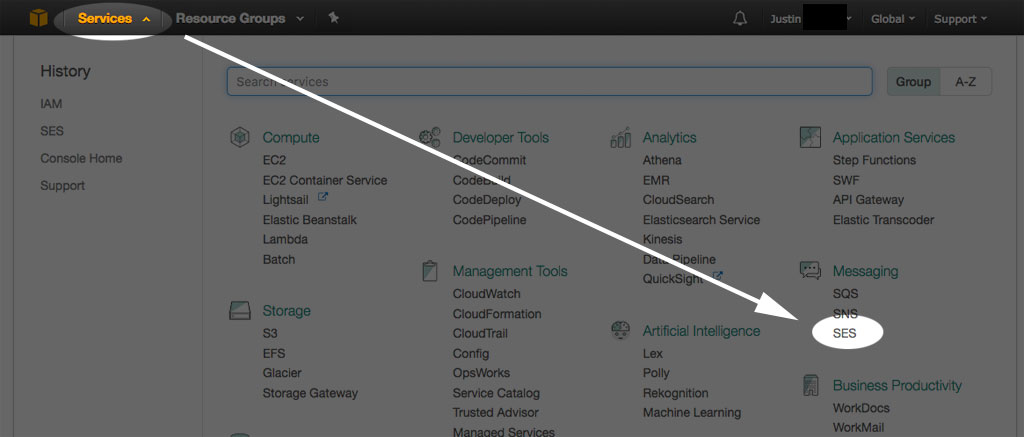
Services: SES
AWS has the idea of Endpoints, so you want to make sure you do all of the following work on the same Endpoint that you've set up Dada Mail to utilize. In this doc, we're using the, US West (Oregon) endpoint.
On the left hand menu, click the, Domains link, then click the, Verify a New Domain button.
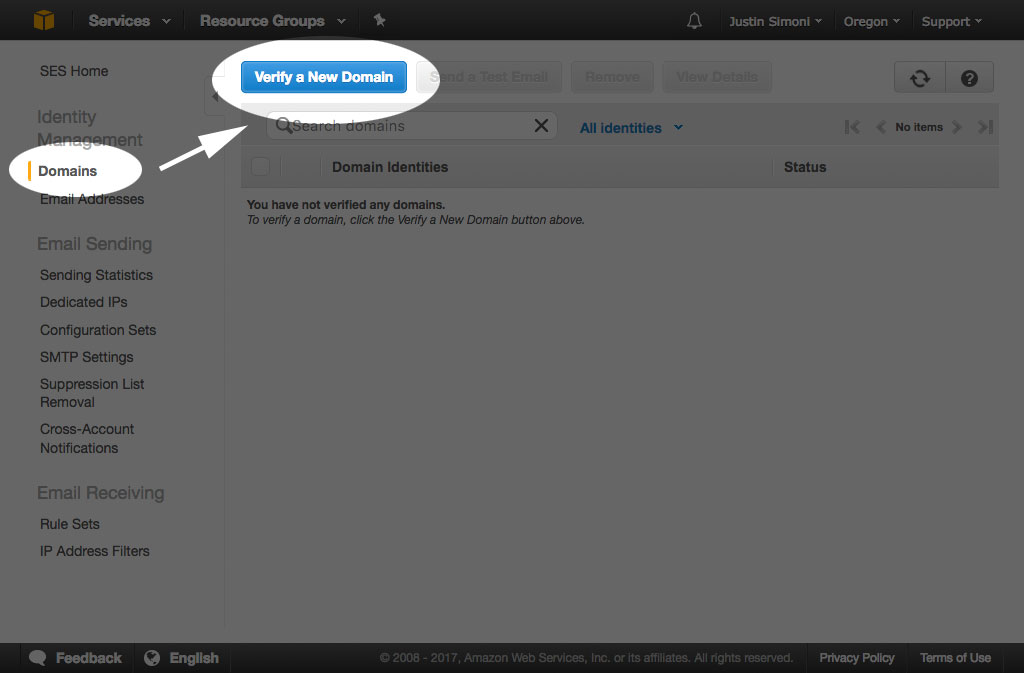
Domains: Verify a New Domain
A modal menu will be revelaed.
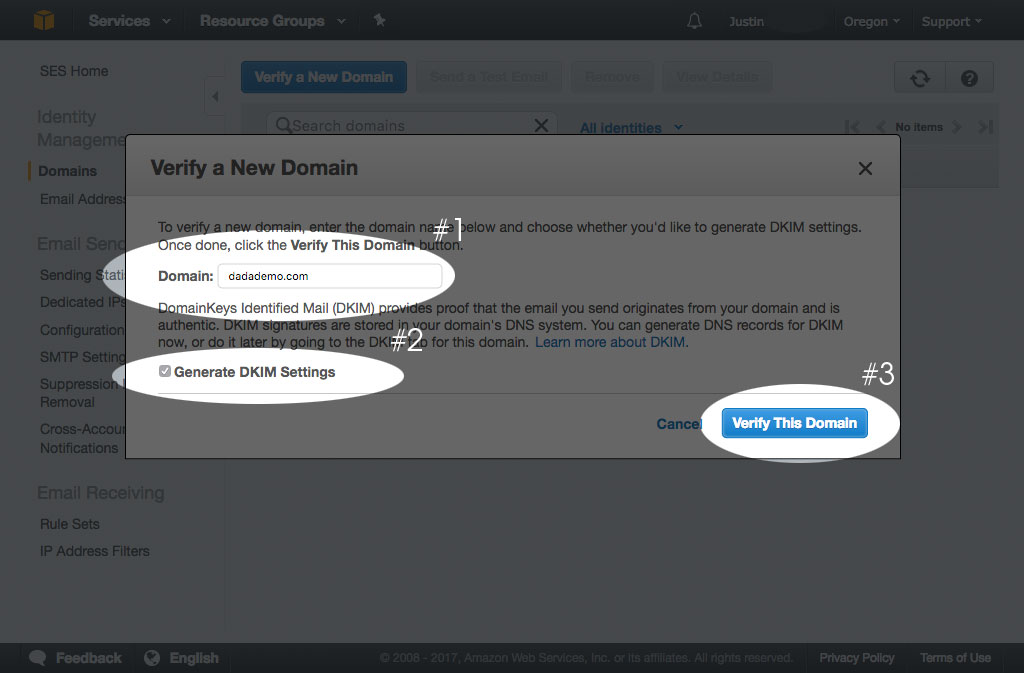
Under, Domain enter the domain you would like to verify (#1). Also make sure to check the, Generate DKIM Settings checkbox (#2). In this doc, we're using, dadademo.com as our domain.
Click the button labeled, Verify This Domain (#3)
Domains: Verify a New Domain
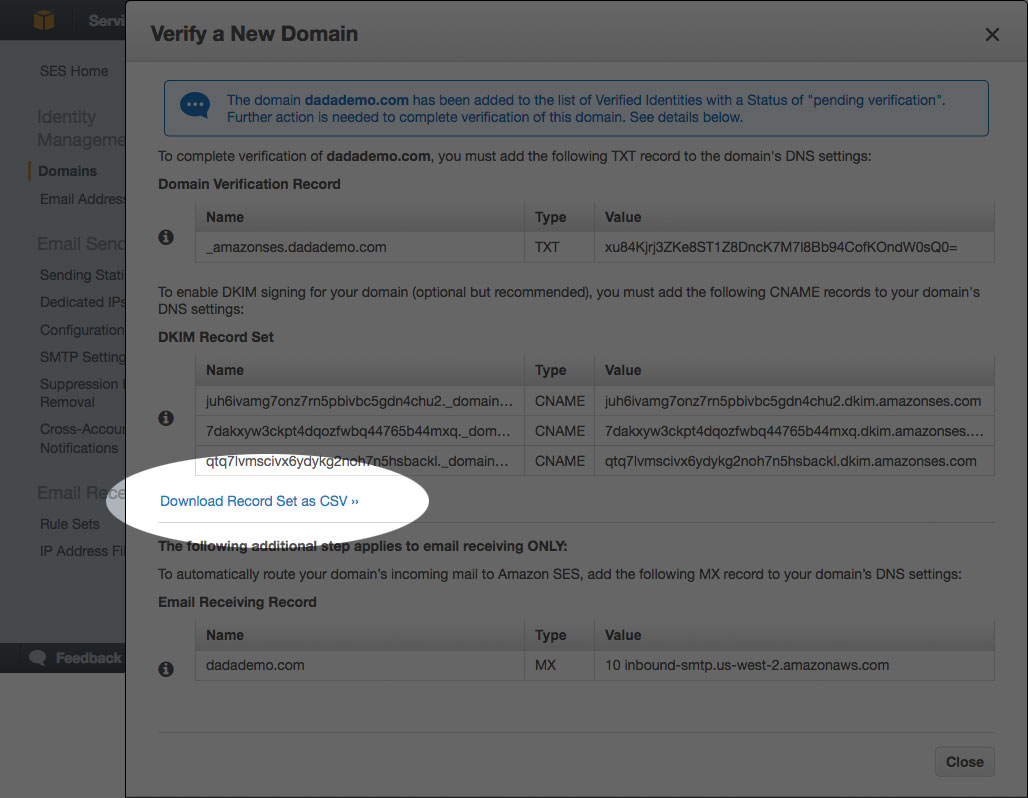
A series of TXT and CNAME records will be created for you, and AWS will monitor your DNS records to see if those records are set up. Once they are, your domain will be verified.
Click the link labeled, Download Record Set as CSV to download the DNS records you need to set up.
Download DNS Records
Here's what they look like for me:
        "Domain verification record set:"
        "Record name","Record type","Record Value"
        "_amazonses.dadademo.com","TXT","xu84Kjrj3ZKe8ST1Z8DncK7M7l8Bb94CofKOndW0sQ0="

        "Alternate domain verification record:"
        "Record name","Record type","Record Value"
        "dadademo.com","TXT","amazonses:xu84Kjrj3ZKe8ST1Z8DncK7M7l8Bb94CofKOndW0sQ0="

        "DKIM record set:"
        "Record name","Record type","Record Value"
        "juh6ivamg7onz7rn5pbivbc5gdn4chu2._domainkey.dadademo.com","CNAME","juh6ivamg7onz7rn5pbivbc5gdn4chu2.dkim.amazonses.com"
        "7dakxyw3ckpt4dqozfwbq44765b44mxq._domainkey.dadademo.com","CNAME","7dakxyw3ckpt4dqozfwbq44765b44mxq.dkim.amazonses.com"
        "qtq7lvmscivx6ydykg2noh7n5hsbackl._domainkey.dadademo.com","CNAME","qtq7lvmscivx6ydykg2noh7n5hsbackl.dkim.amazonses.com"
We're most concered with the TXT record. The record name is,
_amazonses.dadademo.comand the Record Value is,
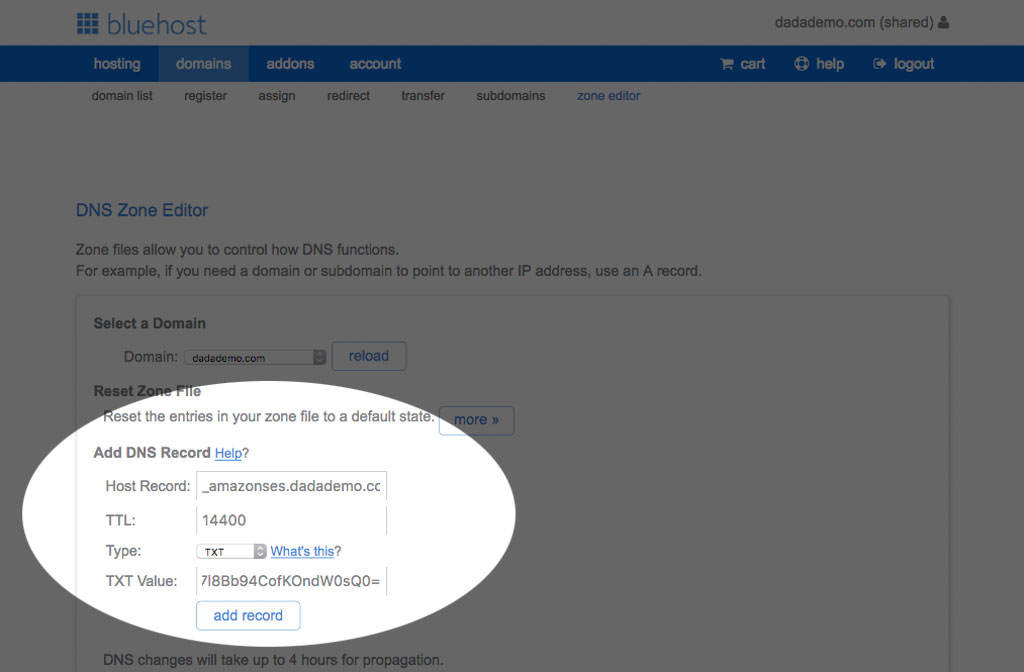
xu84Kjrj3ZKe8ST1Z8DncK7M7l8Bb94CofKOndW0sQ0Our website is managed via cPanel - and so is our DNS settings. In our demo, we would log into our cPanel, and go to DNS Zone Editor. Look under, Add DNS Record:
For, Host Record:, we would paste in,
_amazonses.dadademo.comChange the Type to, TXT,
For Text Value, we would paste in:
xu84Kjrj3ZKe8ST1Z8DncK7M7l8Bb94CofKOndW0sQ0=Then, we would click the add record button.
Repeat these steps for the three CNAME records, with a slight change:
Under Type, select CNAME and not TXT.
Download DNS Records
If everything is successful, the domain will then be verified. You can test to see if the domain is verified back in the Amazon AWS Console.
Setting up a Mailing List to use Amazon SES Sending
Once the AWS Endpoint, Access Key ID and Secret Access Key are configured in Dada Mail, you may then set up a mailing list to use SES for sending.
Log into one of your mailing lists and go to, Sending: Options
Select, Amazon Simple Email Service, then click, Save Changes

Download DNS Records
If you haven't already, you'll need to also Verify each sender that'll be using the service. Once you've verified a domain, all addresses under that domain may be used. Any other address will need this verification.
For Dada Mail, that means verifying the List Owner, and if you're using the Bounce Handler (which you should!), the List Administration email address.
Under Amazon SES Tools fill in your List Owner's email address, and click, Verify.
That email account will receive an email message from Amazon AWS, with a verification link to click to finish the verification process.
Other Ways to Verify a Sender
The Amazon SES Dashboard its elf allows you to Verify a Sender:
https://console.aws.amazon.com/ses/home?#verified-senders-email:
Click the button labeled, Verify a New Email Address to get started.
Set Your Mass Mailing Batch Settings
When using SES for mail sending in Dada Mail, it's important to keep below the sending quota set by Amazon SES. This limit can fluctuate - usually upwards, while you use the service.
To make things easier, Dada Mail can be set to automatically adjust its Batch Settings to work within your limit.
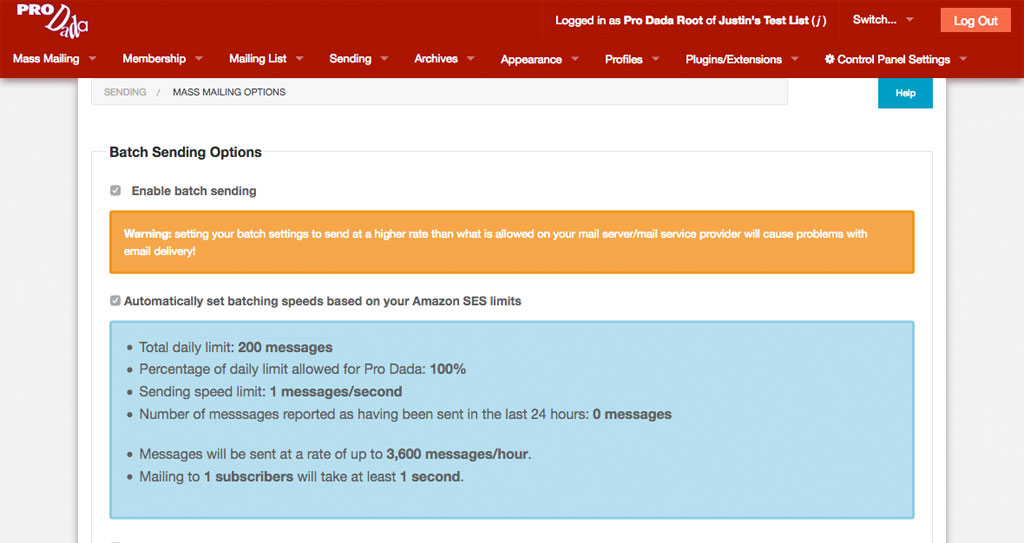
In Dada Mail's List Control Panel, go to: Sending - Mass Mailing Options and check:
Automatically set batching speeds based on your Amazon SES limits
Download DNS Records
Your batch settings will now grow or shrink, depending on your current Amazon SES sending limits.
If you do go over your total 24 hour quota, mass mailings will not be sent out, and batches will be set to wait for 5 minutes, before trying to be sent again. When your 24 hour quota is lifted, sending will once again take place.
For the most part, Dada Mail will attempt to aggressively keep your batch sending speeds high, until you start coming near your daily mail quota set by SES.
When that happens, batch sending speeds will creep lower, to accomadate your limits. At no point should Dada Mail send either faster than it should, either by going over the limit per second limit, or the 24 hour limit.
Your SES sending limits themselves should creep up, as you use the service. Keeping the mass sending rates high will show the Amazon AWS system that you're utilizing the system, and they're most likely going to want to raise the limit for you, without further intervention.
Configure Dada Mail to use the SMTP Gateway Provided by Amazon SES
Rather than using the API, you can use Amazon SES via its SMTP Gateway. There's a few downsides: if you don't set up a IAM user, you won't get automatic batch settings, sending statistics, and you can't verify a sending witin Dada Mail. Mass mailing may not be as fast. The advantage may be that it's easier to set up.
First, sign into your AWS console.
Go to Services: SES.
Once the screen has refreshed:
Click, SMTP Settings on the left hand menu.
Copy the server listed by, Server Name. In my case, it's email-smtp.us-west-2.amazonaws.com
Click the button labeled, Create My SMTP Credentials
Once the screen has refreshed:
Optionally change the, IAM User Name:, then click the button labeled, Create
Once the screen has refreshed:
Your SMTP Credentials should be ready to be utilized! Click the link labeled, Show User SMTP Security Credentials to reveal your SMTP credentials.
The SMTP Username and SMTP Password will be revealed. Copy both these values.
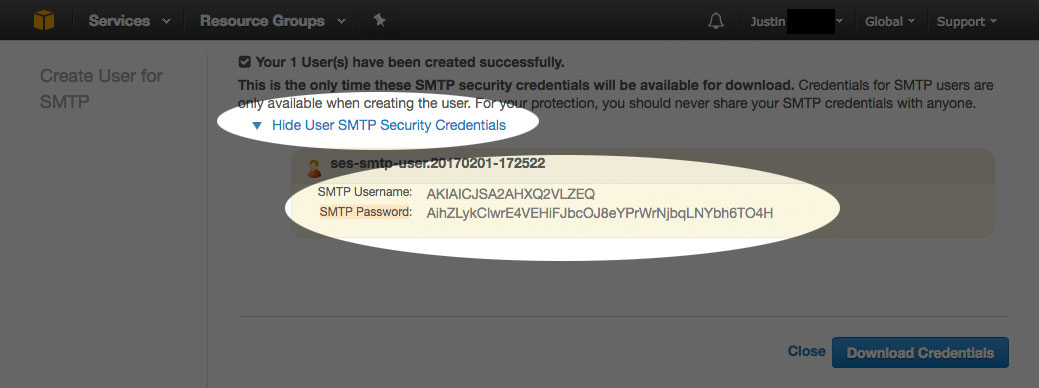
SMTP Credentials
In Dada Mail's List Control Panel, go to: Sending: Options.
Select SMTP (and NOT Amazon Simple Email Service) and fill out the SMTP Server. For this demo it's: email-smtp.us-west-2.amazonaws.com.
Set, Port to, 465
Check, Use Secure Sockets Layer (SSL)
Check, Use SMTP Authentication (SASL)
and fill in the Username and Password with what we just created.
After you've finished, SES should now be set up for your list. Click the button labeled, Save, Then Test to both save and test your new SMTP configuration. A modal window will be revealed, with the results of the test:
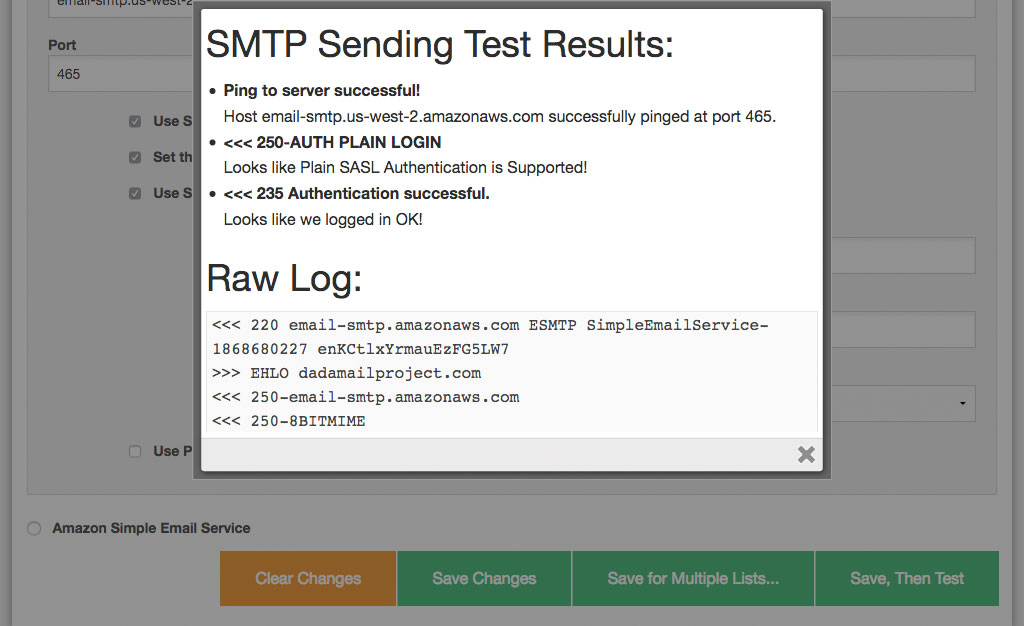
SMTP Test Results
An email will also be sent to the List Owner. If that message is received, the SMTP has been configured correctly, and email sending has been shown to be working:
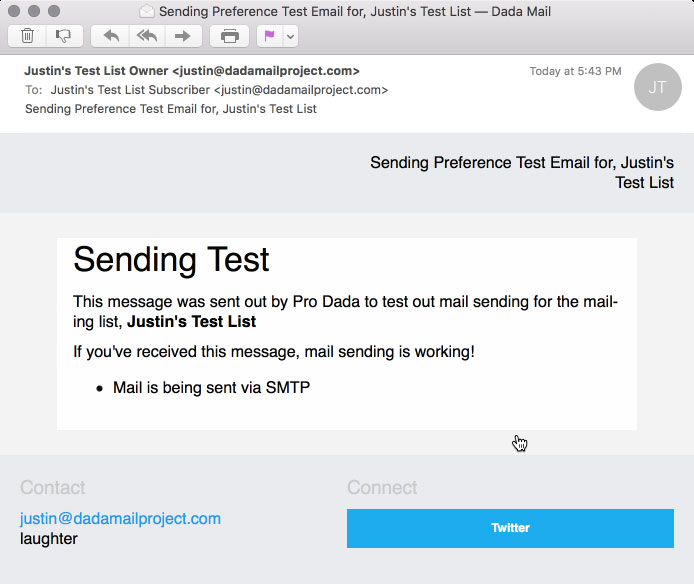
SMTP Test Results
Request Full Production Access
Once you're done testing Amazon SES with Dada Mail, you'll want to request full production access here:
http://aws.amazon.com/ses/fullaccessrequest
Without full production access, you'll only be able to send messages to addresses that have been manually verified.
When requesting production access, you'll be asked a few different questions - make sure to take your time and answer these questtions thoughtfully, as someone will check that your answer comply with the AWS and SES terms of service.
Of note make sure the following are set:
Limit Type: SES Sending Limits
Region: Same as Endpoint set up in your Dada Mail install
Remember we set our region to use, US West (Oregon), so that's what we'd set up here, too.
Limit: Desired Daily Sending Quota
New limit value: 50000
This could be any number, really, but by default (and as I type this), Amazon SES will give you 50,000 messages you may send out per day by default when you ask for Production Access.
Mail Type: Subscription/Marketing
This will actually be different, depending on how you use Dada Mail. Take your best guess.
My email-sending complies with the AWS Service Terms and AUP: Yes
I only send to recipients who have specifically requested my mail: Yes
I have a process to handle bounces and complaints: Yes
Most likely, this also means you've set up the Bounce Handler in Dada Mail!
Use Case Description
This, I feel, is the most important field to fill out. You will want to describe how you intend to use the Amazon SES service.
Some strong points you will want to consider communicating is that your mailing list only has subscribers that have been verified, that you follow ALL best practices for sending out mass mailing, and you have in place ways to deal with bounced messages and complaints.
You may even want to mention you're using Dada Mail to help handle all this!
Once the form is submitted, it'll take approx. one day to get an answer via email. Once you do get a positive answer, you're ready to use Amazon SES in production. Hurray!
Limitations
Amazon SES API
Performance
Sending via Amazon SES is done with a persistent HTTP connection, so performance should be pretty good!. Expect around .3 seconds/message for just passing the email message from Dada Mail to the Amazon SES service.
Discussion List Support
Along with the List Owner and List Administration address, be sure to verify the, List Email address with Amazon SES.
Different email headers sent
Amazon has a list of supported email headers:
http://docs.amazonwebservices.com/ses/latest/DeveloperGuide/AppendixHeaders.html
Dada Mail usually sends messages out with a different set of email headers:
The, Message-ID header will be sent as the, X-Message-ID header.
The, List header will be sent as the, X-List header.
Email headers that are not supported by Amazon SES are automatically not sent out.
Dependencies
Amazon SES requires a few more CPAN Perl modules than the base Dada Mail install requires. Make sure you already have, or can install the following CPAN Perl modules:
Cwd
Digest::SHA
URI::Escape
MIME::Base64
LWP::Protocol::https
XML::LibXML
LWP
Installing, Bundle::DadaMailXXL will install all of the above modules.
See also the FAQ, How do you install, "CPAN Perl Modules"
https://dadamailproject.com/d/FAQ-installing_CPAN_Perl_modules.pod.html
Related Projects
We've seperated out the work we've done with Amazon and using a persistent HTTP connection. That project is located at:
https://github.com/justingit/Net--Amazon--SES